
Teams: FAQ
General information
Public team
A public team is findable for all UU users.
Double click left in the Teams menu on ‘Teams’ and click on ‘Join or create team’ at the top right corner. With the search bar you can search for public teams. Every user can join such a team without approval of the team owner.
If a team is public then the SharePoint site of the team is public as well. This means that all UU users have access to this site. All documents and recordings of Teams meeting that were made within this team are publicly available for all UU users. Be aware of this if you’re using a public team.
Private team
A private team is a closed environment. Only people who are added to the team by the team owner have access to the team and all of the related content on the SharePoint site of the team.
Is my team public or private?
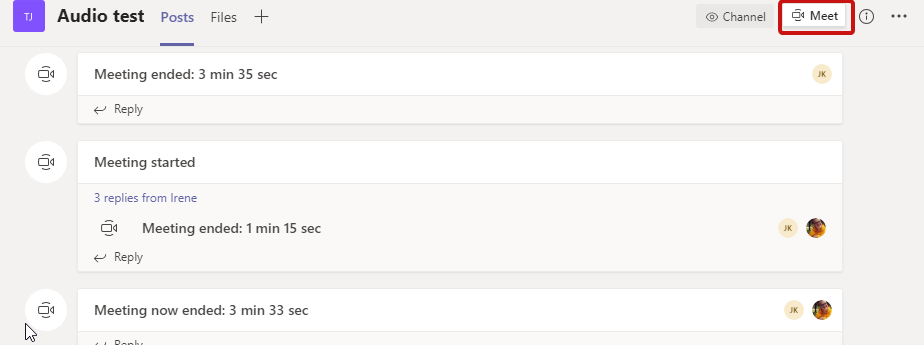
You can answer this question by checking the privacy indicator of the team. Open the team and look at the top right corner. The privacy indicator is displayed left from the ‘Meet’ button.
Org – this indicates the team is public
Team – this indicates the team is private
How do I change the privacy settings of my team?
Open your team and click on the three dots behind your team name. Choose for ‘Edit team’. Below ‘Privacy’ you select the desired setting. Click on ‘Update’ to apply.
Recordings made in Teams of meetings will from August 7th 2021 be saved in SharePoint or OneDrive instead of Stream, the video service of Microsoft 365.
Recordings of old meetings that are already in Stream will remain there for the time being. In the future, these recordings will be migrated to SharePoint or OneDrive.
More information can be found here: https://intranet.uu.nl/en/news/announcements/recordings-of-teams-meetings-will-be-saved-in-sharepoint-or-onedrive-from-7-august-onwards.
You can share or download a recording if you want. When you go to the location of the file (Onedrive or Sharepoint), click on the three dots next to the file name. Here you can choose either ‘Share’ or ‘Download’.
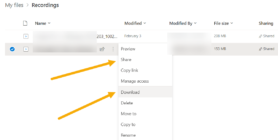
Note: Recordings are no longer stored in the OneDrive of the person who clicks ‘record’, but in the OneDrive of the meeting organizer.
- Owners
Team owners manage certain settings for the team. They add and remove members, add guests, change team settings, and handle administrative tasks. There can be multiple owners in a team. - Members
Members are the people in the team. They talk with other team members in conversations. They can view and usually upload and change files. They also do the usual sorts of collaboration that the team owners have permitted. - Guests
Guests are people from outside of your organization that a team owner invites, such as partners or consultants to join the team. Guests have fewer capabilities than team members or team owners, but there’s still a lot they can do.
The following table shows the capabilities available for each role:
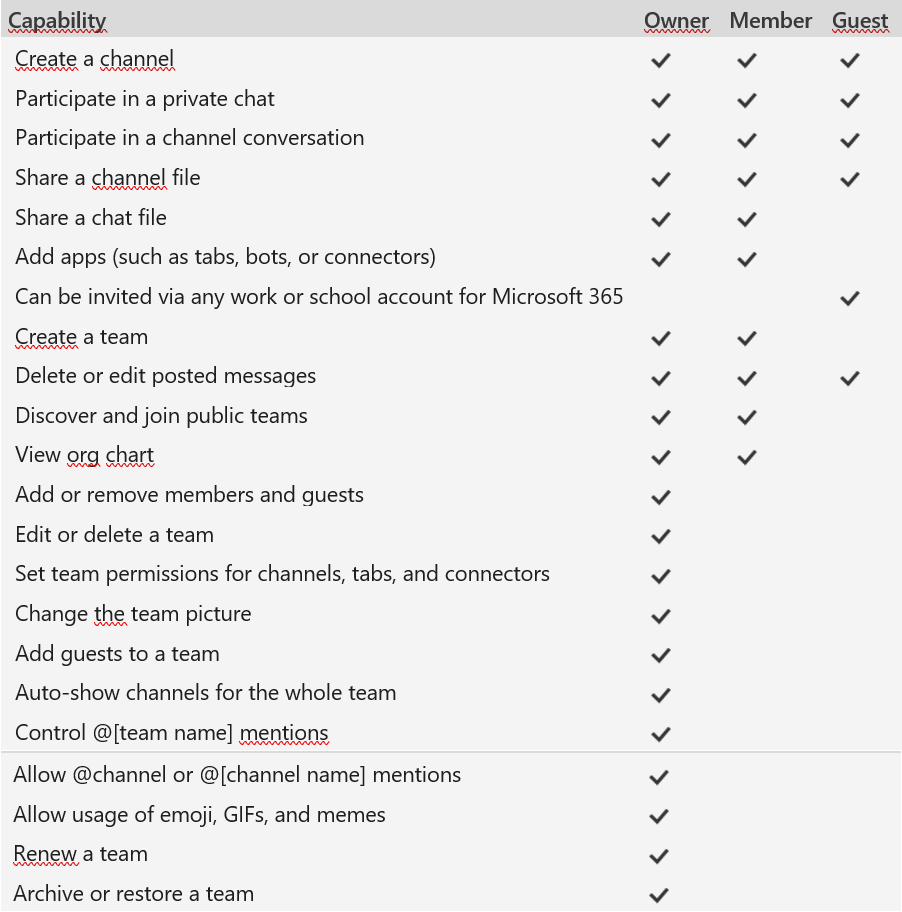
For the most recent version of these capabilities per role, check out this Microsoft page: https://support.microsoft.com/en-us/office/team-owner-member-and-guest-capabilities-in-teams-d03fdf5b-1a6e-48e4-8e07-b13e1350ec7b?ui=en-us&rs=en-us&ad=us
Please note: File permissions for members and guests reflect whatever your admin has set in your SharePoint settings. These can only be changed by your admin.
You might, as a user of Teams, receive an email from Microsoft talking about the expiration of a group.
Such a mail comes from msonlineservicesteam@microsoftonline.com and has as subject “Action Required: Renew [group name] by [date]”.
The mail looks like this:

The image above is an example. In the actual mail, “[group name]” will be replaced by the name of the group it concerns and “[date]” by the relevant expiration date.
What is meant with a “group”?
The term “group” is derived from “Microsoft 365 groups”. Technically this is a service that enables Microsoft 365 users to make use of the various Microsoft 365 components like Teams, SharePoint and Exchange Online (email). The service is connecting the components with each other and is taking care that the users have the correct authorizations on the various components. For this reason a so called “group” is created under the hood when for example a team is created in Microsoft Teams.
Why do I receive this email?
In 90% of the cases you receive this email because you’re a team owner in Microsoft Teams. The group name that is mentioned in the email is probably recognizable as team name.
If you don’t recognize the group name as team name then you should be able to recognize the name as one of the following things:
- The name of a group you created in Outlook in the past or of which you are (co-)owner.
- The name of a plan you created in Planner in the past or of which you are (co-)owner.
- The name of a group you created in Stream in the past or of which you are (co-)owner.
What do I have to do with this email?
If the team (or one of the other mentioned objects above) must be retained then one of the owners should click on the Renew group button.
What will happen if I do nothing with this email?
The owners have 30 days to execute this action. If the owners do not respond during this period then after this period all of the data (like the team in Microsoft Teams) will be deleted, including all documents within.
Owners will be notified two more times. The first time is after 15 days and the second time is after 29 days. If meanwhile no further action is taken then the group is deleted automatically on day 30.
A deleted group (including the team in Microsoft Teams and all documents) can be restored during a period of 30 days after deletion by ITS. If the group is not restored during this period then everything is deleted permanently.
At the bottom of the email you’re also able to delete the group directly by yourself.
Can I expect more emails like this in the future?
Yes, that’s possible. From now on an email like this will be sent if for example a team is not used anymore for a year. If you are an owner of such a team you can expect an email like this again.
Forwarding messages in Microsoft Teams to external users is not directly supported within the Teams interface itself. However, you can use a few workarounds to achieve this, including copying the message content manually or leveraging email integration features. Here are the steps for these methods:
Method 1: Copy and Paste the Message Content
- Open Microsoft Teams and go to the chat or channel where the message is located.
- Select the Message: Hover over the message you want to forward.
- Copy the Message:
- Click on the “…” (More options) next to the message.
- Select “Copy” from the menu.
- Open Your Email Client: Open Outlook or any other email client you use.
- Paste the Message: Paste the copied content into a new email.
- Send the Email: Enter the external recipient’s email address and send the email.
Method 2: Email Integration in Teams
You can use the “Share to Outlook” feature to forward a Teams message via email, which is particularly useful if you want to include message context and formatting.
- Open Microsoft Teams and locate the message you want to forward.
- Use the “Share to Outlook” Feature:
- Hover over the message.
- Click on the “…” (More options) button.
- Select “Share to Outlook.”
- Compose the Email:
- A new email window will open in Outlook with the message content included.
- Enter the external recipient’s email address.
- Send the Email: Complete and send the email.
Method 3: Forwarding an Entire Conversation
If you need to forward an entire conversation or multiple messages, you can copy and paste the content as described in Method 1 or take screenshots and send them via email.
- Open Microsoft Teams and go to the conversation.
- Select and Copy the Conversation: Click and drag to select multiple messages, then right-click and select “Copy.”
- Paste into an Email: Open your email client and paste the conversation content into a new email.
- Send the Email: Enter the recipient’s email address and send the email.
Summary
While Microsoft Teams does not offer a built-in feature to forward messages directly to external users, you can use the above methods to achieve this. Manually copying and pasting the content, using the “Share to Outlook” feature, or sending email attachments are all effective workarounds to forward Teams messages to external recipients.
Before and during a meeting
If people in a meeting can’t hear you, you might be muted or you might not have configured your mic correctly.
To change your speaker, microphone, or camera settings when you’re on a call or in a meeting, select “More options” > “Show device settings” in your meeting controls. Then, select the speaker, microphone, and camera options you want.

When you want to start a meeting from a channel you can use the “Meet now” button:
When you have not enabled the “New meeting experience” You will see the below window (you can enable the the “New meeting experience” in your settings on the general tab).
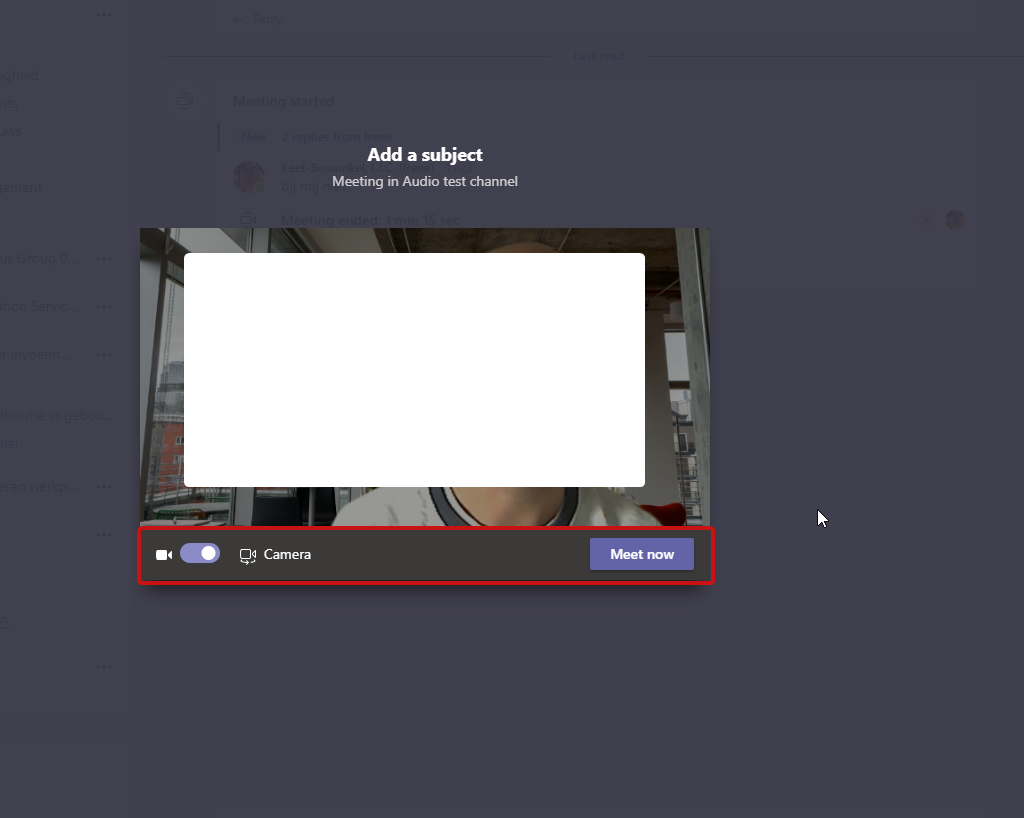
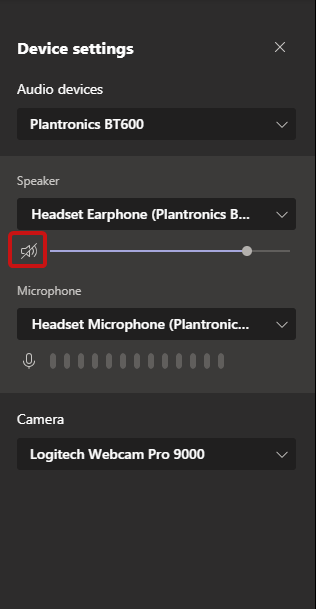
By default, your speaker will be muted. You can change this while you’re in the meeting by click on the *** and go to the Device settings.
Here you can change your device settings and un-mute your speakers.
If you’re using a Mac and you’re having trouble getting your microphone to work, you might need to change one of your privacy settings.
Here’s how to check:
- Open System Preferences
- Select Security & Privacy
- Under Privacy, choose Microphone on the left
- Make sure Microsoft Teams is selected
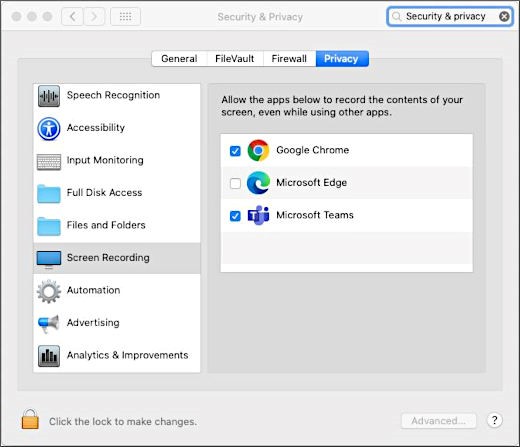
If you do not have the option to share your screen or other content during a Teams meeting this might be caused by a security and privacy setting in MacOS.
For example: after an update of the OS or application some settings might have been changed that make sharing content impossible.
To solve this you can try the following:
- On your Apple device go to: System Preferences > Security > Privacy
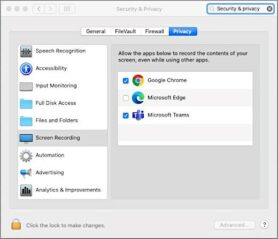
- Go to Screen recording (if necessary click on the lock icon to be able to make changes)
- Check the box for Microsoft Teams
- Click ‘Agree’
- Restart your device
If you organize an online Teams meeting you’re able to invite people from outside UU via their email address. These guests are only invited to participate in this specific meeting. Here they can make use of audio & video, share their screen and make use of the meeting chat.
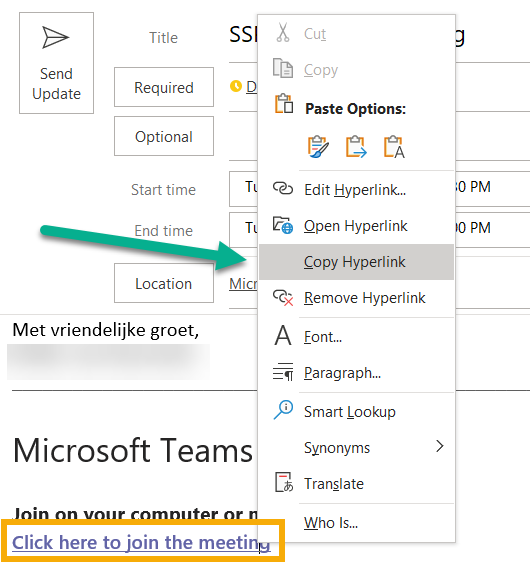
To invite guest you can also share the invitation link of the meeting. You can send this link via email, Whatsapp or publish it somewhere online. To get the link, go to the meeting and copy the URL behind ‘Click here to join the meeting’.
Only if the guest is using an email address that he’s already using for Teams (for example in the own organization or as a guest in a team) then after the meeting he’s able to read the chat history. This chat can also be continued.
Joining an online Teams meeting never automatically results in access to any of the teams. It is also not necessary to be a member of a Team in order to participate in a meeting.
If you want to know more about guest users in Teams, check out this manual: Teams: logging in as a (guest) user after receiving an invitation email
You can have up to 1000 active participants in a meeting. These people can join the meeting and chat. When the meeting is created by a UU employee you can also have up to 10,000 passive participants in your meeting, this means they can only listen and not chat. These ‘view-only’ participants get a delay of about 30 seconds compared to the main meeting.
When the meeting is full, anyone who is a presenter or organiser in the meeting will see a banner at the top of the screen announcing that the meeting is full and subsequent participants will be view-only:
 There are some things that are good to know when your meeting might go over the limit:
- First of all: the lobby settings. In the meeting options you can set who can go directly into a meeting, and who goes into the lobby and has to wait for approval. View-only participants cannot skip the lobby. For example, have you configured that only UU people may enter the meeting without a lobby? Then participant 1001, who is not from the UU, cannot enter your meeting.
- In addition, the view-only experience does not currently distinguish between presenters and attendees. The organiser can always enter the meeting, but if you have a presenter who is late and wants to enter the meeting when it is already full, this presenter will also get the view-only variant. This means that this person cannot present either.
- It’s also good to know that when the meeting is no longer full, new participants can join in the normal way. Teams will therefore know when there is capacity in your meeting again. PLEASE NOTE: this applies to new participants. View-only participants will not automatically be “promoted” to regular participants.
- Finally: Teams doesn’t make a distinction between whether you were in the meeting before or whether you’re completely new. Are you in the main meeting, which is full, but you leave to have lunch or make another phone call? Is the meeting still full when you get back? Then you get the view-only experience.
Once you’ve created a meeting you can change several settings before you begin (or during). You can do this by going to the meeting in Teams and clicking on ‘Meeting options’.
 You will see the following window open in your browser:
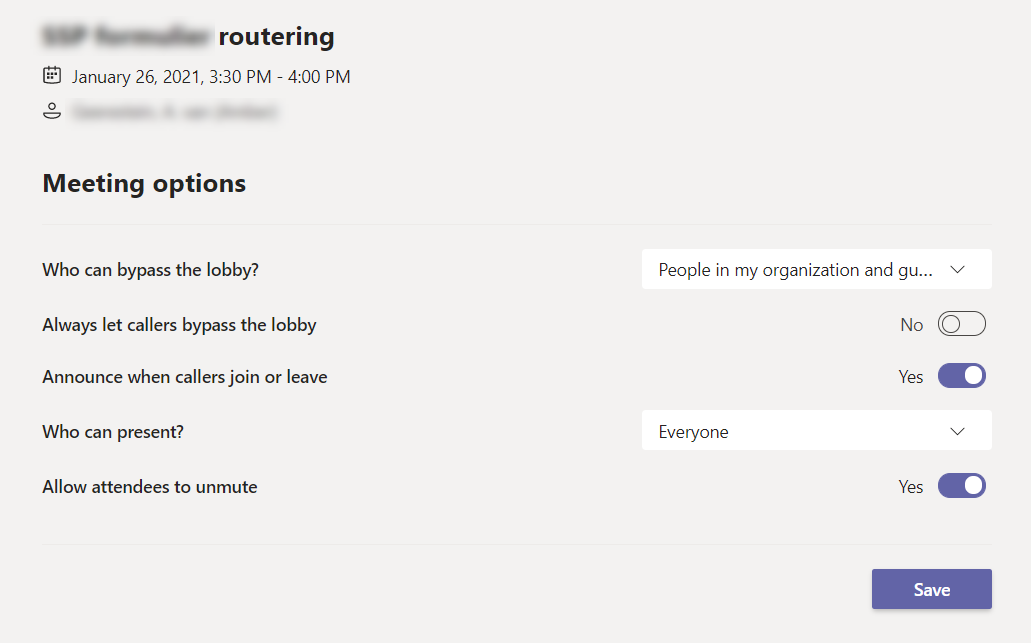
By default the settings are as in the image above, but you can choose to, for example, not make people wait in the lobby or choose who is allowed to present. The last option allows you to choose whether people can unmute themselves or not. If you choose ‘no’, noone can speak during the meeting by unmuting themselves.
When organizing a public live event in Teams you can add people from outside the UU as presenters (or producers). It can happen however, that this person wants to join this event but is unable to choose the role of presenter.
This might be due to the different ways you can join a live event or meeting as a guest. It is different to be a guest in a Teams or in a meeting/live event.
You can solve this by adding the guest who need to be able to present to the relevant Teams. This can be an existing team or you can make a new one for a specific meeting and delete it again after the live event. Either way the guest gets the right type of guest role and will be able to present in the live event.
After adding the guest to the Team, he or she will have to log in and join again. Then the guest should be able to present.
Please note: the most important thing is that someone needs to log into the web browser after being added to a team.
For more information about how to join a Teams meeting or event you can check out this manual: Teams: logging in as a (guest) user after receiving an invitation email
You have three options for organizing a Teams event:
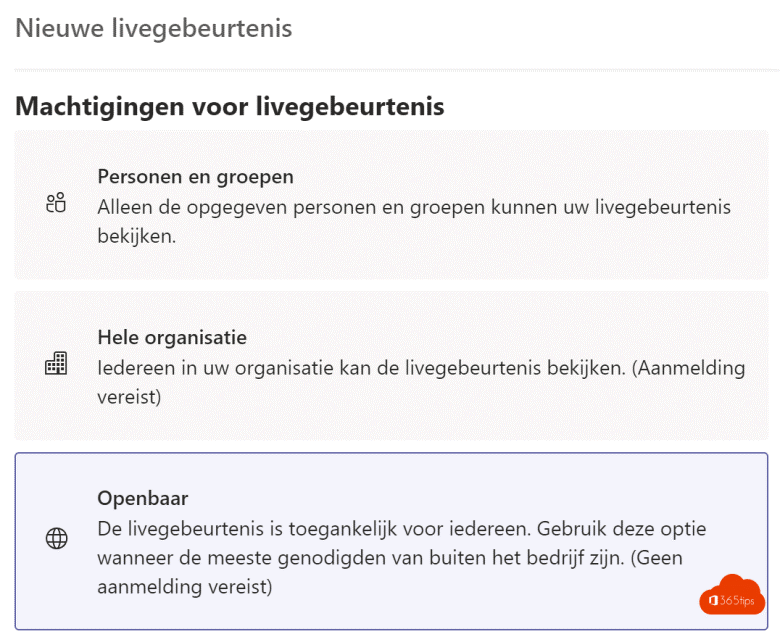
You need extra rights to be able to create a public live event in Teams. These rights can be granted temporarily by the Office 365 team.
You can request these right by contacting the Servicedesk and supplying the following information:
- The name of the person that wants to create the event
- The date/time of the event
- The number of expected participants (and the number of guest participants)
In a Teams meeting it’s possible that the chat functionality is unavailable. This can be noticed in two different ways:
- The chat button is visible, but greyed out. In this case you can hover your mouse over the chat button, but then you’ll see the notification “Chat in channel meetings is only available to team members”.
- The chat button is not visible at all.
When can I make use of the chat functionality?
In the following situations you can make use of chat in Teams meetings:

*A “UU user” is a user with an @uu.nl or @students.uu.nl email address.
Non-channel meeting
A non-channel meeting is a meeting that is scheduled through the Outlook or Teams calendar.
Chat is always available in this type of meeting.
Channel meeting
A channel meeting is a meeting that is scheduled in a Teams channel.
For an optimal Teams experience it’s recommended to add the attendees as members to the team as much as possible and to make use of the desktop application.
After a meeting
The recording of a meeting can be found in the ‘Recordings’ folder in the OneDrive of the meeting organizer.
Note: When a meeting is organized from a non-personal mailbox (shared mailbox), the recording will end up in the OneDrive of the person who starts the recording. If you start the recording from a Teams device in a meeting room, the recording will end up in the OneDrive of the room.
When you click ‘meet now’ from a Teams device in a meeting room and directly call someone, the recording will also end up in the OneDrive of the room.
The recording will, however, automatically be shared with all (non-external) participants.
Last modified: 11/09/2025