
Video platform UU: FAQ
-

General
The video platform UU is the platform with which you can record, upload, edit and share lectures and knowledge clips. This can be done at home behind your own computer or within the UU in the specially designed and equipped lecture halls or studios.
On the intranet page of the new video platform you will find more information about the new platform and where you need to be if you have any questions.
Via https://video.uu.nl/. login with your Solis-id and 2fa by clicking on the button: Login (top right).
Go to the video platform (video.uu.nl) and find the video you want to watch. Click on the video to play it. Wait for the video to start playing.
At the bottom of the video player, you will find several controls, including a full-screen icon. Click this icon to view the video in full screen.
Remember that this takes 5 seconds before the blue bar disappears. The video is now displayed in full screen.
The player’s controls are hidden, to display the controls again, move your mouse over the screen and the controls will appear at the bottom of the video.When you have finished watching the video in full screen, press the ESC key on the keyboard or click the full screen icon at the bottom of the video to return to the normal view.
Here you can find the manuals and if you have any questions, go to the intranet page of the new video platform.
-
Share, move, delete and download videos
Once the video has been published (see the heading: How to publish a video?), you can share the video with others. This is done as follows:
Click on the relevant video and click on the ‘Share’ icon. A menu will expand; click on ‘Share’.
The following screen will open:

Click on the ‘copy’ icon to copy the link.
Click on the ‘gear’ icon for more options.
You can share the copied link with your felllow students or teachers, for example via BlackBoard or by email.
To download a video, you need ‘Edit’ rights.
Go to the video you want to download and click on ‘Edit’, then go to the tab ‘Community’.
Click on one of the links to download the desired file.
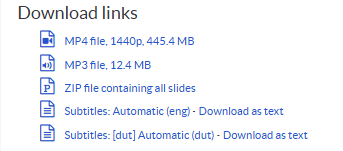
If you chose for a MP4 or MP3 file, you’ll see a screen with the audio of the selected video being played.
In this screen you’ll also find commands.
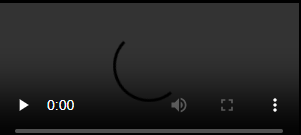
Click on the 3 dots and you’ll find a new choice menu, with the download option:
Click on download.
If the download is completed you’ll find it in the browser download history. (Top right corner for most browser options)
You can only delete videos if they are in your own channel. Do you want to remove a video from a course channel? Then move it to your own channel first (see question ‘How do I move a video?’ below) and then delete the video.

Please note: only teachers can remove video’s from a course channel. Students can only share video’s from their personal channel.
- Open the video and click on ‘Edit’, you will end up in the ‘Parameters’
- Under the heading ‘Location’ you can move the video, click on ‘select a channel’, you will see the screen below:

- Select the channel in which you want to place the video. You can search for the correct channel via the tree structure on the left or via the ‘Search’ button above (use course code or course title as search term).
- Click on ‘Select this channel’.
Click on ‘Save Changes’ (bottom right) and click on the arrow
 (top left) to go back.
In the Videoplatform it is not possible to combine two separate video’s into one. This is only possible before uploading the video to the Videoplatform with designated software for video editing. Contact the Teaching Support Desk (teachingsupport@uu.nl) for extra support.
Unfortunately, you won’t be able to pause a recording when you are recording material within the Videoplatform at home. You can only pause recordings that are recorded within a lecture hall.
You can take a break whenever you need it during your recording and trim the video afterwards to remove the parts in which you took a break. Don’t know how to trim your video? Take a look at this tutorial for more information.
-
Publish a video
To be able to publish a video, the following matters are important (see also the manual: Video platform UU: Adding metadata, moving and publishing videos)
- When ‘Editing’ the video, under the tab ‘Parameters’ there is check mark (
 ) next to ‘Published’.
 - The video is in the correct course channel. In this way you authorize students who follow this course within a faculty.
Students can only watch videos that are in the course channel of their own faculty. If a student is following a course outside his/her own faculty, it is important to grant this student rights to the video. This can be done as follows:
Method/Procedure
By making the video available from within the course channel to ‘Authenticated Users’ (users with a valid Solis-ID), you give all students within the university access to this video. This means that students outside your faculty can also see the video. The video must then be actively shared with these students via a link. For see: How do I share a video? or Hide your videos
Go to the video and click on ‘Edit’ and go to the tab ’Permissions’ and under ‘Authenticated users’, below the heading ‘Access’, enter a ‘Yes’ instead of ‘Untouched’.
Do not forget to click on ‘Save changes’.

If you want to open up an entire channel for students, you can contact the key users, https://intranet.uu.nl/en/uu-video-platform
By making the video available from within the course channel to ‘Authenticated Users’ (users with a valid Solis-ID), you give all students within the university access to this video. However, the video can only be accessed with a link. See heading: How do I share a video?
You can share videos from your own channel as follows. Go to the relevant video via ‘My channel’.

Go to the video and click on ‘Edit’ and go to the tab ‘Permissions’ and under ‘Authenticated users’, below the heading ‘Access’, enter a ‘Yes’ instead of ‘Untouched’.
Do not forget to click on ‘Save changes’ (bottom right).

- When ‘Editing’ the video, under the tab ‘Parameters’ there is check mark (
-
How are the authorizations arranged in video platform?
- Students study at a specific faculty and they have access to all videos under the faculty folder where they are studying. In addition, they have access to the videos that are shared UU-wide.
- Teachers and students have the option to make and publish videos in addition to viewing rights on the faculty channel where they work.
Teachers have additional rights to the course edition channel to which they are connected (this is done automatically), where they can edit and publish videos.
If the video is in the course channel to which the colleague is connected, your colleague has the option to edit the video.
- How can you share a video with a small group of specific persons, e.g., when it comes to privacy sensitive videos?
- How do you share a channel/video with the whole world?
This is possible, please contact the Teaching Support Desk (teachingsupport@uu.nl).
You have the option to hide your videos by checking the option: “Unlisted”. If this option is checked, only students with a link can watch the video and people who have edit rights can look up the video using the “Search” functionality or browse to the video through the folder structure.
Method/Procedure
step 1 Go to the video and click on “Edit” and go to the Permissions tab and check the option: Unlisted.
Step 2
This step is only important if students outside your faculty need to access the video.Change Untouched to Yes in the same screen under Authenticated users under: Access.

Don’t forget to click on: Save changes.
-
Audio
To switch microphones, complete the following steps:
- Click ‘Add content’ à ‘Record’
- To start a record, choose a source à choose one of the options.
- Select the screen you want to share and click ‘Share’. The recording screen will open:

- Click on the microphone or camera icon at the top right of the screen and click on ‘Manage’.
- An extra tab will be opened in your browser: ‘Settings’, under the heading ‘Privacy and security’. By clicking on ‘Microphone’ or ‘Camera’ under the heading ‘Rights’, you can switch devices.
- After making your choice, you can close the ‘settings’ tab and return to the recording screen. To make sure the sound is recorded, you can test this by saying something; the microphone should then turn on. You cannot set the sound level with this.

If this is not the case, close the recording screen and make a new recording. Please note, in some cases you will get the error message ‘A recording session is already running, please complete it before launching a new one’. Refreshing the browser (F5) will fix this and you can start a new recording.
The only way to record the sound of, for example, a YouTube video is through the speakers. This does result in considerable loss of sound.
It is also possible to insert a YouTube video into your presentation: add the YouTube link in video. For more information, see the knowledge clip: Chapters, attachments and statistics.
Recording the sound with headphones in combination with a microphone is not possible. For more information: How to switch from microphone/camera when recording at home.
Unfortunately, this cannot be prevented. To reduce these noises you could use headphones in combination with a microphone. For more information: How to switch microphone/camera when recording at home.
-
Errors
When making a new recording, you get the notification:
‘A recording session is already running, please complete it before launching a new one.’
This can happen if you started a recording but closed the recording screen without taking a recording. By refreshing the browser (F5) this is resolved and you can start a new recording.
People with a Mac computer will receive this message if Google Chrome cannot access the camera. This can be set as follows: Go to ‘System Preferences’ > ‘Security & Privacy’ > ‘Privacy’ Tab.
Check if Google Chrome can access the Camera and Screen recording.
-
Annotations in videos and notifications of annotations
Open the video and click on ‘Edit’ and go to the ‘Community’ tab, see heading ‘Annotations’.

By default, you will receive a notification when an annotation is made for all videos where you are listed as ‘speaker’. This can be found under the tab ‘Parameter’ in the Edit mode of a video.
An overview of the videos for which you will be notified can be found under ‘My profile’, under the heading ‘Specific media email notifications’.

Click on the video and go through the following steps:
- Click on ‘Comments, chapters, …’
- Click on the three dots (right of the screen)
- Then click on ‘Approve’

Go to the video and go through the following steps:
- Click on ‘Comments, chapters, …’
- Click on ‘Show filters’ (bottom of the screen)
- Then click on ‘Disable notifications’ or ‘Enable notifications”

-
Subtitling videos
Open the video and click on ‘Edit’ and go to the tab ‘Subtitles’. Click on ‘Start an automatic transcription’

Then choose the language of the video and click on ‘Generate’; the subtitles will now be created. This can take some time. It is ready when your subtitles have the status ‘File done’.
Open the video and click on ‘Edit’ and go to the tab ‘Subtitles’. Click on ‘Edit File’.

Now a text file will be opened in which you can make adjustments. Here you can also change the title of the subtitles.
With this button the viewer can switch on the subtitles.

Last modified: 5/03/2025