
Video platform UU: Recording videos
In this guide you can read how to make knowledge clips/videos that include (for example) your PowerPoint presentation and yourself. It is also possible to make a recording of yourself or just the computer screen.
This manual is explicitly about recording videos with Webstudio (own device).
Before you get started
- Close as many applications as possible, open Chrome or Firefox* and go to the following URL: https://video.uu.nl, click on
 in the top right corner, and login with your Solis-ID.
 - Open your PowerPoint presentation or any other application you want to record.
- Make sure the microphone you want to use (the internal microphone or headphones in combination with a microphone) is connected.
* We advise Mac users to use Chrome.
Other manuals
-

Step 1
If you want to see the control panel and yourself alongside your PowerPoint presentation, you have to set your presentation to Reading View. You can do this by clicking on “Reading view” (see the image) or clicking on “Reading View” in the menu View.
-
Step 2
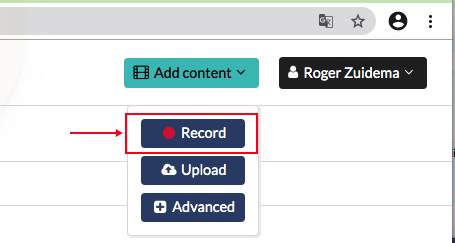
Click on: “Add content” and then on “Record”.
-
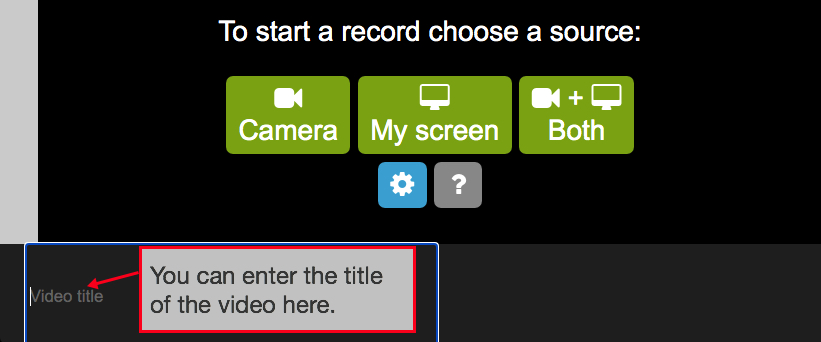
Step 3
Click on the “Both” option to record a PowerPoint presentation as well as yourself. It is also possible to only record yourself (“Camera” button) or the computer screen (“My screen” button).
Note: In your first recording, Chrome will ask for permission to:
– Use your microphone
– Use your cameraFor both questions, click on ‘Allow’ to continue.
-
Step 4
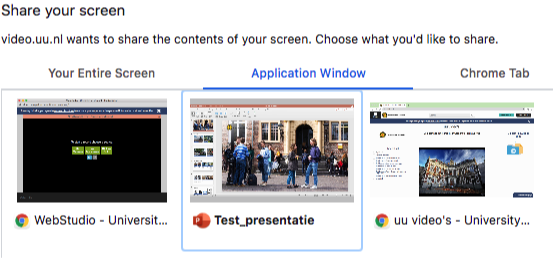
Video.uu.nl wants to share the contents of your screen, choose what you’d like to share. In this case, select the PowerPoint presentation under the Application Window and then click “Share”.
-

Step 5
The PowerPoint presentation opens with a pop-up at the bottom.
-

Step 6
A new screen will open in your browser.
If you want to change and reposition the size of the windows (the recording area), please use the following steps:
- Click on one of the screens, a red frame will appear.
- Now you can resize and reposition the frame.
- Click your right mouse button for more options.
Attention: The right screen must show the PowerPoint presentation that you want to record, if this screen is black, something went wrong. If this is the case, restart Chrome of Firefox.
-
Step 7
Now click the red button to start recording.
After you click the red button, you have 5 seconds before the recording starts. In those 5 seconds you can, for example start your PowerPoint presentation.
-

Step 8
Click the red button to stop recording. Note: if your presentation is full screen, then first click “Esc” on your keyboard.
The pop-up closes after a few seconds and you return to the video platform.
-

Note: Lost your recording? Contact the IT Service Desk immediately.
-
Step 9
After the video is recorded, it will be processed. This can take some time. You can find the status of processing under the video:

In the meantime, you can record a new video.
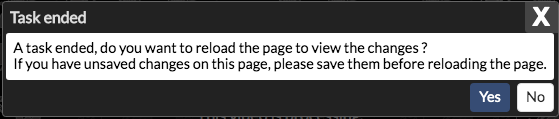
When the video is ready, you’ll see the following notification appear (see the image). Click on “Yes”.
-
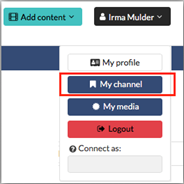
Step 10
The video is stored in your personal channel. Your personal channel can be found in the top right corner.
From your personal channel, you can edit the video or publish it directly. See the manual: Adding metadata, moving and publishing videos.
-
For more information, please visit:
- The intranet page of the new video platform for general information on how to record lectures or knowledge.
- The instructional videos on how to use the video platform.
- Video platform FAQ.
Last modified: 14/12/2023