
Whiteboard: installation and FAQ
This manual describes how to install and use Microsoft Whiteboard. MS Whiteboard is a tool with digital whiteboard functionality meant for group use. For example, to work together during a brainstorm session.
You can use MS Whiteboard as an application on your (Windows) computer or directly within a MS Teams meeting. MS Whiteboard is part of Office 365.
Installation on a (Windows) computer
You can install MS Whiteboard directly from the Microsoft Store. The use of the Whiteboard application is free.
-
Step 1
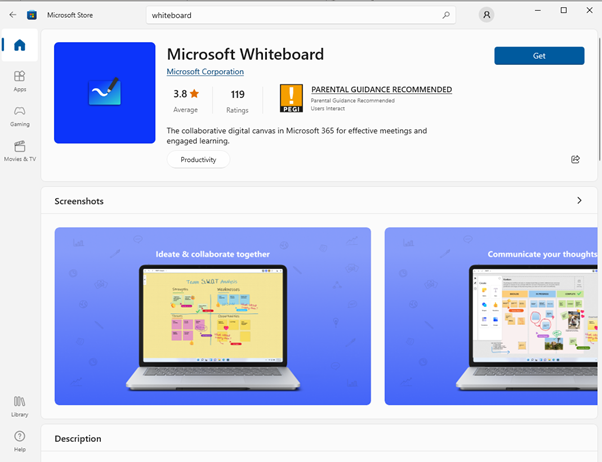
- Open the Microsoft Store via ‘Start’ and search for Microsoft Whiteboard.
-
Step 2
- Then click ‘Get’.
-
Step 3
Click on ‘Open’ and select ‘Work or school account’ at Microsoft’s login screen, enter your UU e-mail address and verify your 2FA. Whiteboard is now installed and ready to use.
-

Whiteboard FAQ
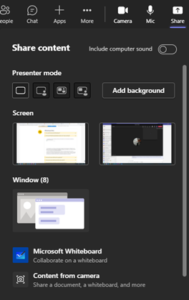
- Click on the ‘Share’ button during a Teams meeting (the icon with the downward pointing arrow) and select ‘Whiteboard’.
- All participants in this Teams meeting have access to this whiteboard. Whether the participants can edit or only view the whiteboard (‘read-only’ status) depends on which option is chosen beforehand. Check out this page for more information: Microsoft help page.
All your whiteboards will be saved in your own university employee or student account. You can find your whiteboard in several ways:
In the Whiteboard application:
- Open the app on your computer
- In the first window you will see an overview of all whiteboards, these include all the whiteboards created during a Teams meeting.
- When making a whiteboard, click on the ‘Home’ button (the house) to return to the overview of your whiteboards.
In a Teams meeting:
- Go the Microsoft Teams calendar
- Open the relevant meeting and go to the tab ‘Whiteboard’
All participants of the Teams meeting have access to this whiteboard. The whiteboard will be available as soon as a Teams meeting is created, and can be used before the start of the meeting.
- Open the whiteboard in Microsoft Whiteboard.
- Click on the icon ‘Share’ in the top right corner.
- In the screen that appears, you can specify who can see the whiteboard and select if they can make changes or not.
It is also possible to share a whiteboard with guest users.
eYes, for Mac users the web version of Whiteboard is available via Microsoft Teams or in a web browser. However, the online version (web browser) offers less functionality than the Whiteboard application.
For more information about the differences check out this Microsoft site.
If you have shared a whiteboard with someone you can, at a later date, change if they can make changes to the whiteboard or not.
- Open the whiteboard in Microsoft Whiteboard.
- Click the icon ‘Share’ in the top right corner.
- At the bottom of the screen that appears, you can see with whom you shared the whiteboard. Click on the person whose permission you want to change.
- Click the three dots (…) next to the link.
- In the screen that appears, you can change the permission of this person and select whether they can view or edit the whiteboard.
- Click ‘Apply’.
No, it is not recommended to share personal data in Whiteboard with others. It is highly recommended to remove the whiteboard immediately after the meeting if personal data has been placed on it.
Check the intranet (https://intranet.uu.nl/en/privacy) to gain insight into the privacy obligations and the handling of personal data.
You can find it here: Aanvullende privacy policy voor Microsoft Whiteboard (only in Dutch).
To export
- Open the whiteboard in Microsoft Whiteboard.
- Click the gear wheel icon (‘settings’) in the top right corner.
- Click ‘export image’ or ‘export PDF’.
- In the File Explorer window that opens, you can choose where you want to save the image or PDF.
To delete
- In the overview of your whiteboards, click the three dots (…) of the whiteboard you want to delete.
- Click ‘delete’.
Please note: this will permanently delete the whiteboard.
- Open the whiteboard in Microsoft Whiteboard.
- Click the plus sign on the left side (‘Create’)
- Click ‘Templates’, choose the correct category and choose the template you want to use.
Note: templates are also available in the web version of Whiteboard.
It is possible to prepare a whiteboard before a meeting begins.
- In Microsoft Teams, click on ‘Calendar’
- Open the meeting chat and click on the Whiteboard tab
- A new whiteboard will be opened automatically and can be filled in before the meeting.
Everyone invited to the meeting automatically has access to the Whiteboard.
- Open the whiteboard in Microsoft Whiteboard.
- Click the gear wheel icon (‘settings’) in the top right corner.
- Click ‘Privacy and security’.
- In this menu you can enable of disable the cloud functionality of the ‘Optional connected experiences’.
These functionalities make use of Microsoft cloud services in which Microsoft is the Controller and Utrecht University has no formal role. The diagnostic data of this use (not the content you create) is stored in the United States. This data is pseudonymized, however in accordance with the GDPR guidelines, this is seen as personal data.
For more information (a roadmap and more manuals) see: Office 365 support page.
- Click on the ‘Share’ button during a Teams meeting (the icon with the downward pointing arrow) and select ‘Whiteboard’.
-

Please visit the Microsoft support page for more FAQ on Whiteboard.
Last modified: 7/11/2022