
Teams: organise a webinar/conference (small groups)
Are you organizing a webinar/workshop for less than 300 participants and would you like participants to be able to see and hear each other? This manual explains how to set this up using a Teams environment.
Would you like to organize a conference, live event or webinar in Teams for more than 300 participants? Check out this manual for organizing a webinar through a live event: Teams: organize a webinar using a live event (large groups)
The limit of 300 participants is flexible, you can invite more active participants if necessary, however we recommend to organize a live event for large groups rather than a meeting which allows more interaction.
Setting up or changing a conference or webinar is done via the Teams desktop application (not online or via Outlook). If you haven’t installed it yet, you can find more information about installing Teams here: Teams: chat and work together.
-

This manual is based on Microsoft Teams and what the different options and possibilities are in this app. You are of course free to use another app or different settings if that works better for you.
-

Step 1
Setting up a Teams environment
In order to set up a new Team you go to the bottom left of the app and click “Join or create a Team”. Then you choose “Create Team” to create a new Team.
-
Step 2
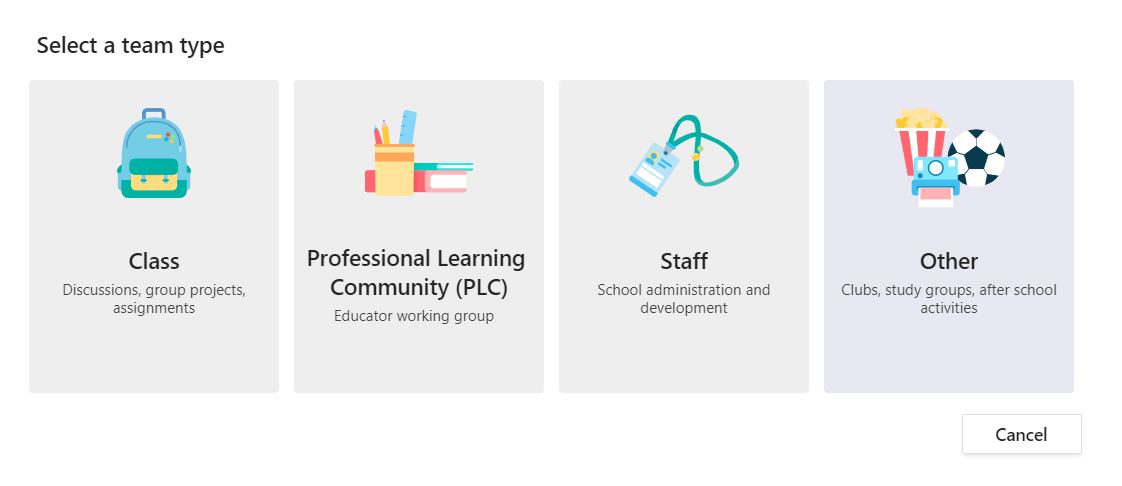
Now you can choose the type of Team you wish to create.
Tip: Choose the type “Other”. This type adds the least extra ‘tabs’ and options you probably won’t need (like a class notebook and assignments).
Then go through the steps as indicated by Teams. You can invite the participants at a later time as well, so you can first set up the Teams environment.
-

Step 3
Adding channels to your Team
Start adding the necessary channels by clicking “Add channel”.
-
Step 4
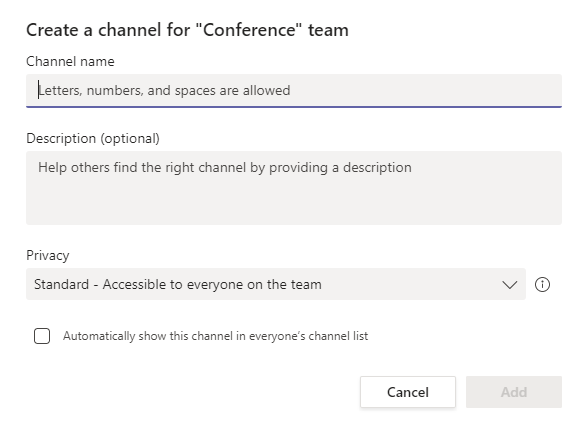
When you add a channel, you will this window (see image on the left).
First, you can choose between a “Standard” and a “Private” channel. For private channels you need to invite specific participants but a standard channel can be seen by any member of the Team. There is a maximum of 30 private channels in Teams. In a private channel it is not possible to schedule a meeting, you can only start a meeting on the spot.
The check mark for “Automatically show this channel in everyone’s list” ensures that a channel is immediately visible when someone opens the Team environment. If you use many channels, not all of them will be visible to the participants. By using this check mark you can specifically choose which channels they are sure to see. You can select up to 10 channels.
-
Step 5
Tips for ‘standard’ channels that are useful when setting up a conference:
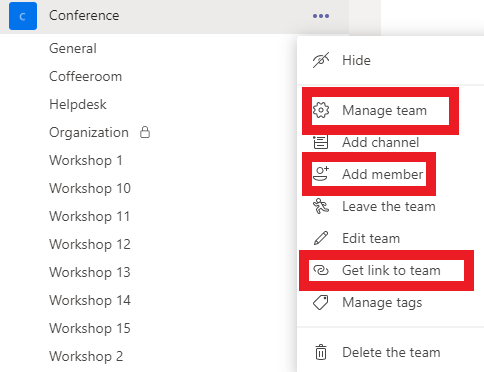
- General. This channel is always present in every Team. We recommend to set up the channel via the ··· > Manage channel so that only “Owners” of the Team can post messages here. This prevents visitors to the conference from ‘polluting’ this channel with questions.
- Helpdesk (Standard, automatically visible). This channel can be used by a participant with questions or if he/she cannot find the right channel. One or more members of the organization can start a meeting in this channel and participants can join and leave when their question is answered.
- Organization (Private). You can use this channel to stay in touch with each other during the conference. In this channel you can also share important files.
- Coffee room / Network tables (Standard, automatically visible). Here you could, for example, set up several ‘tables’. In this channel multiple meetings can take place at the same time and you could also post a message explaining that participants can start a meeting themselves via the button in the top right.
- Channel per workshop (Standard, not automatically visible). By creating one channel per workshop it is clear to the participant where he/she needs to be. If necessary, you can share the link to the correct channel with the participant at the same time as registering. This way he/she doesn’t have to search where he/she needs to be. The link to a channel can be found by clicking on the ··· > “Get link to channel”.
-
Step 6
Inviting speakers/presenters
Invite the speakers/workshop organizers to the Team. You can do this in three different ways:
- A Team code (step 7)
- Add people separately (step 8)
- Share a team code (step 9)
-
Step 7
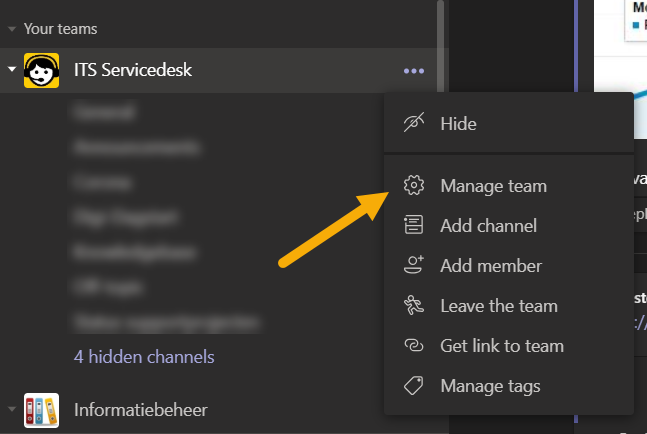
Click on the ··· next to the Team title.
Via “Manage team” > “Settings” > “Team code”, you can generate a team code. Share this code so people can then join the Team by entering the Team Code in the Team application under “Join of create a team”.
Advantages: You only have to share the code once and everyone can then sign up; you don’t have to approve them for the team yet.
Disadvantages: The code is not usable for guests (people outside the organization). -
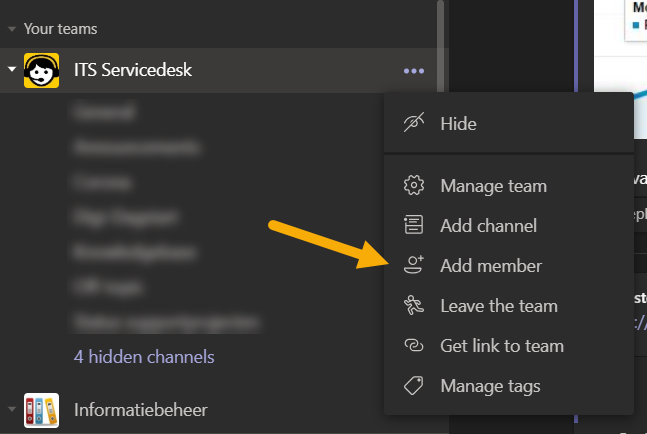
Step 8
Via “Add member” you can manually add people one by one*. This also works for guests.
Advantages: Works for everyone and you know for sure that everyone is in the right Teams environment.
Disadvantages: It take a lot of time.*Do you need help with this? Please contact the ICT service desk.
-
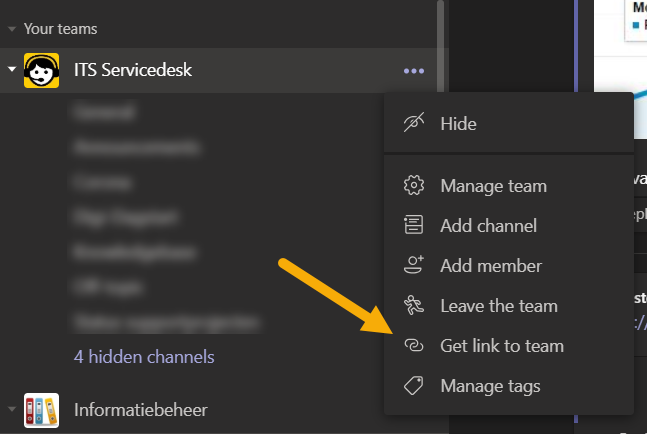
Step 9
Via “Get link to team” you generate a link that you can share with people. By clicking on the link they make a request to join the team. These requests have to be approved manually.
Advantages: Works for everyone and is easy to share.
Disadvantages: The link is not usable for guests (people outside the organization). -

Step 10
Preparations
Set up the various workshops/lectures in the Teams channels. Go to the appropriate channel and click on the arrow next to ‘Meet’ in the top right corner and select “Schedule a meeting”.
You do not have to invite specific participants. If a participant visits the channel, he/she can participate automatically.
In the “Coffee Room” you can prepare and schedule several meetings at the same time. For example, you can give each meeting a different theme as a title. This allows the participants on the day itself to choose a room of which the theme appeals to them as well as provide a topic for the conversation in this meeting.
In the “General” channel you can already set up a welcome message and extra information for participants. They will see this immediately when they visit this channel.
-
Do you want to offer the people that give the workshop the opportunity to make use of break-out rooms where the group of participant can be divided into smaller teams? Read here how you can organise this: Breakout rooms work-around Teams
-
Step 11
Make sure any new Teams users get familiar with MS Teams before the event starts. For this you can use the different existing manuals and tutorials:
- For the installation of Teams for a guest user, you can share this tutorial: Teams: logging in as a (guest) user after receiving an invitation email
- Inform workshop organizers / speakers about the possibilities in a meeting. For this you can use the manual (add once finished)
- Possibly organize a test meeting or make a recording in Teams to show the possibilities.
-
Step 12
Invite participants
Invite the participants to the Teams environment. For this you have the same possibilities as under step 6.
Optionally, you can set up the registration form for workshops in such a way that participants immediately receive a link to the channel where their workshop takes place. The link to a channel can be found by clicking on the ··· next to the title of the channel.
The links to the channels, as explained above, can also be put together in the “General” channel. This allows participants from the “start” channel to click through to the channel where they need to be each time. -
Step 13
Inform and prepare participants
Inform the participants about the platform:
- If relevant, use the manual Teams: following a workshop.
In any case, we recommend you share a similar message as the one below with participants to remind them to install the Teams application and to cover privacy risks;
Microsoft Teams offers a nice, interactive experience that works best with the Teams app. We advise you to download the app if you do not already have it, because not all browsers are supported. When you participate in this event, your name, email address and/or phone number will be visible in the session attendance list. By participating in this event, you agree to this.
- If relevant, use the manual Teams: following a workshop.
-
Step 14
Time for the event!
Make sure that during the event there are always 1 or 2 people present in the “Helpdesk” channel for any questions.
You might also consider offering a short instruction of 15 minutes before the start of the event. This allows participants who need help setting up to connect earlier so everyone is ready to start on time.
-
Step 15
Would you like to message everyone at the same time during the event? Then follow these steps.
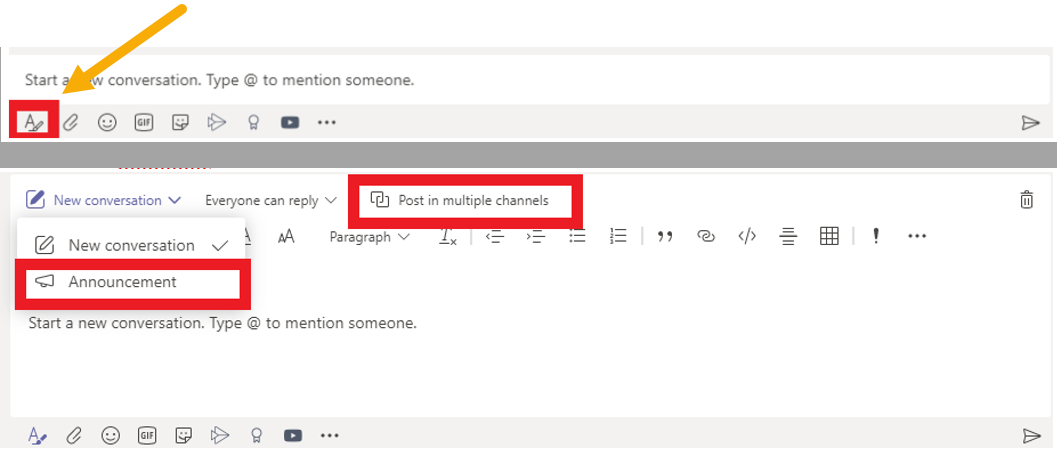
- Go to the “General” channel and click on “New conversation”.
- Click on the “A” sign at the left bottom of the message.
- Choose “Announcement” to make the message stand out.
- Then select “Post in multiple channels” and choose the channels where you want the message to be posted.
Good luck with your event!
Last modified: 30/06/2022