
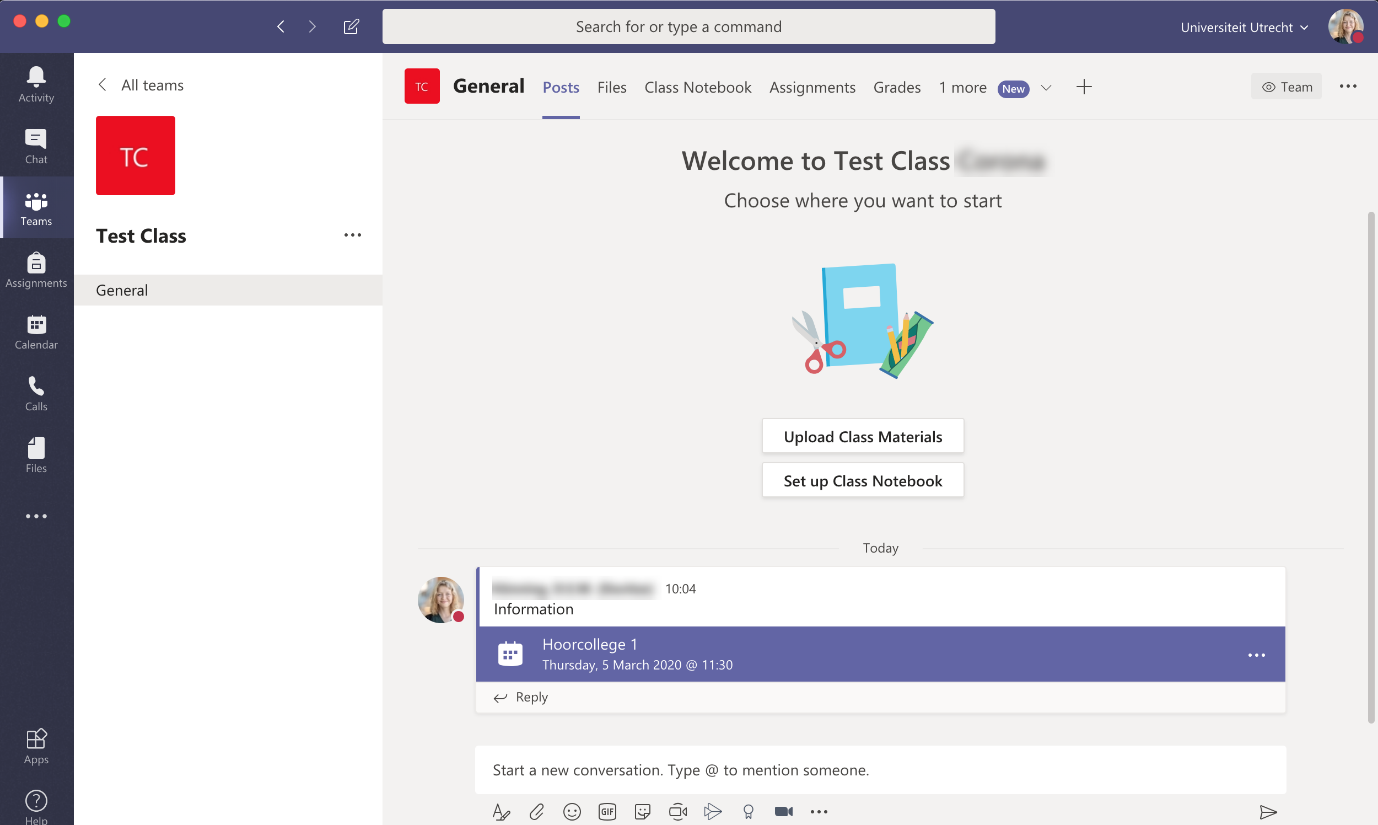
Teams: online classes (Teacher)
This manual is meant for teachers who want to give online lectures and classes. The instruction below is divided in 5 parts:
- Part 1: making a new Team (class)
- Part 2: generating a class code
- Part 3: creating a channel in your Team
- Part 4: giving lectures online
- Part 5: using break out rooms
- Part 6: Teams’ other functionalities
- Part 7: updating – ‘the new meeting experience’
If you haven’t yet installed the Teams application check out this manual for more information: Teams: chat and work together.
-
Step 1
Part 1: Making a new Teams (class)
Create one Team per course so all students of that course can communicate with each other and all students can join the (online) lectures of the course.
If you want to create separate online spaces for different study groups, read the following chapter: ‘Part 3: creating a “Channel” in your team’ .
-

If you are a student – or not connected to the UU – you cannot create a Class Team, because you do not have access to all the functionality of Teams. However you can still participate in video meetings, online classes, chat and share files.
-
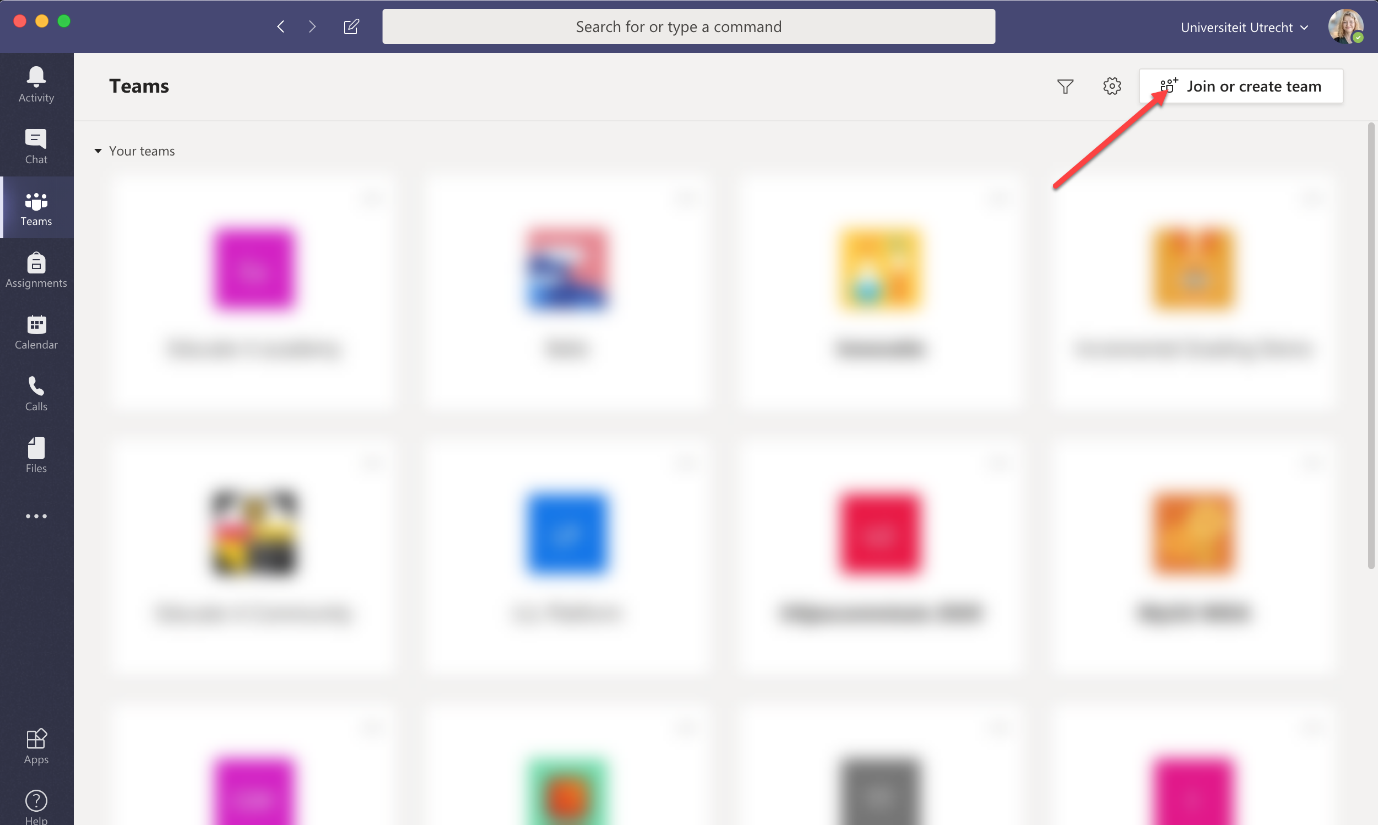
Step 2
- Click ‘Join or create team’ in the top right corner (you might have your Teams in a list on the left rather than in blocks like this, then you’ll find the button in the bottom left).
-

Step 3
- Click ‘Create a class’
-
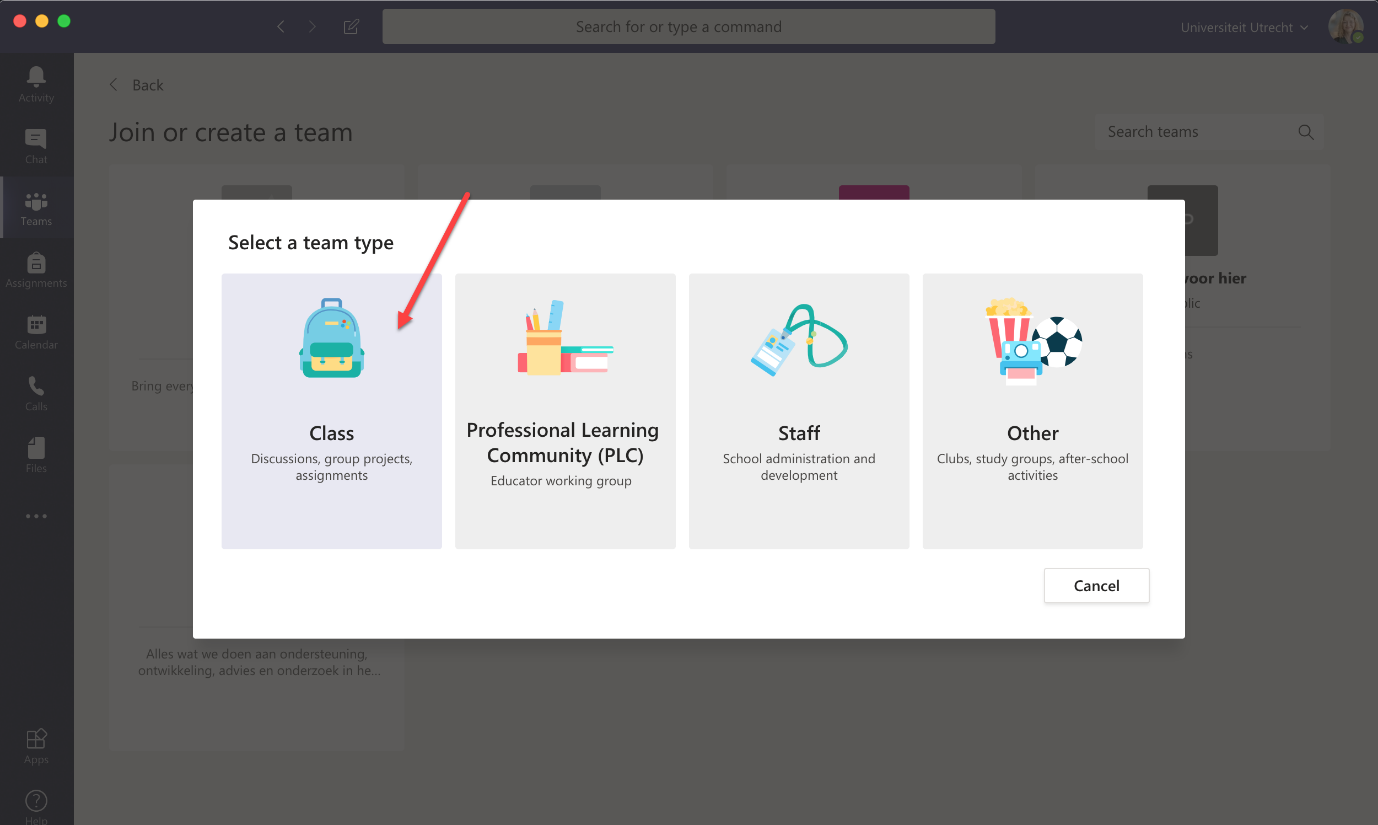
Step 4
- Select the type ‘Class’ for your Team
-
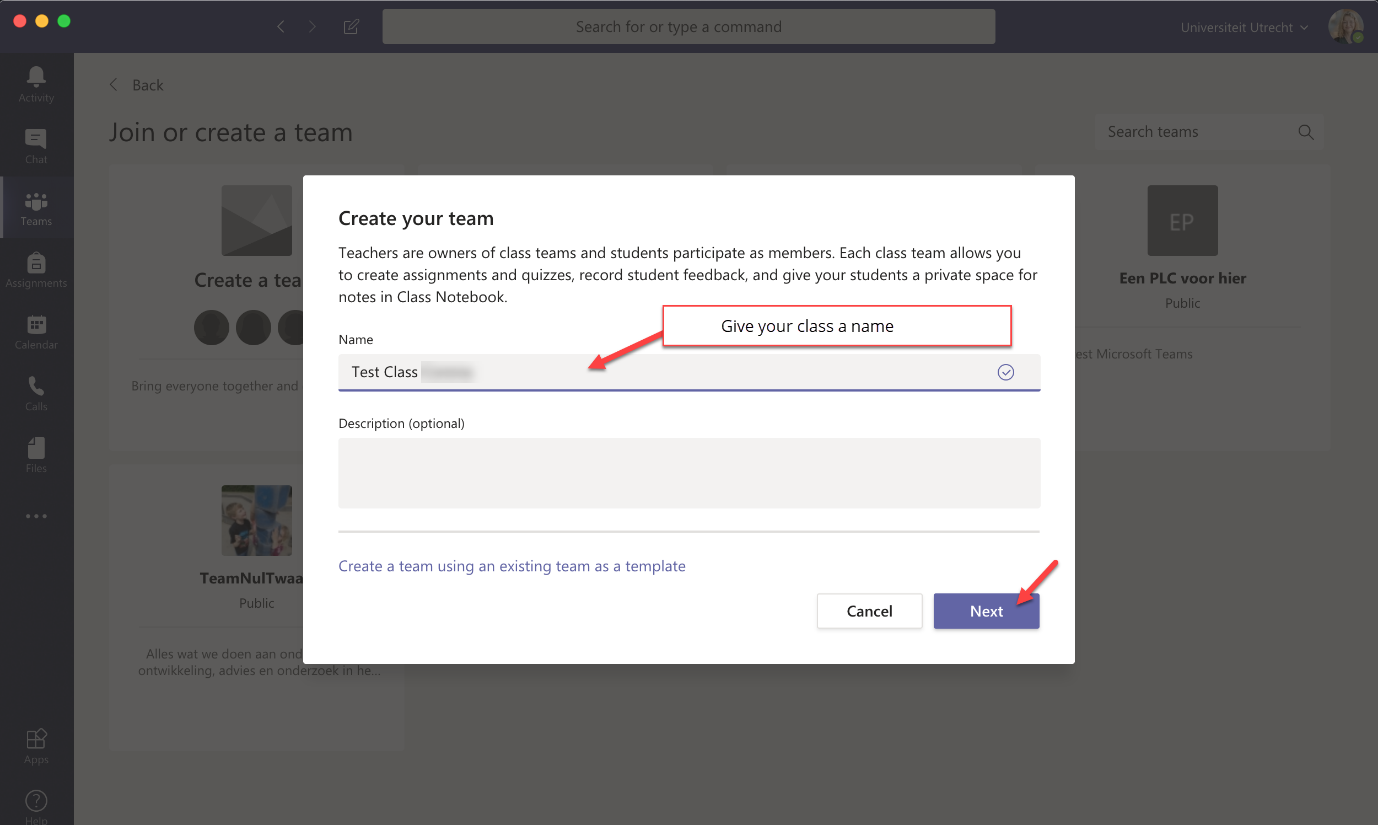
Step 5
- Give your Team a name and if necessary a description
- Click ‘Next’
-
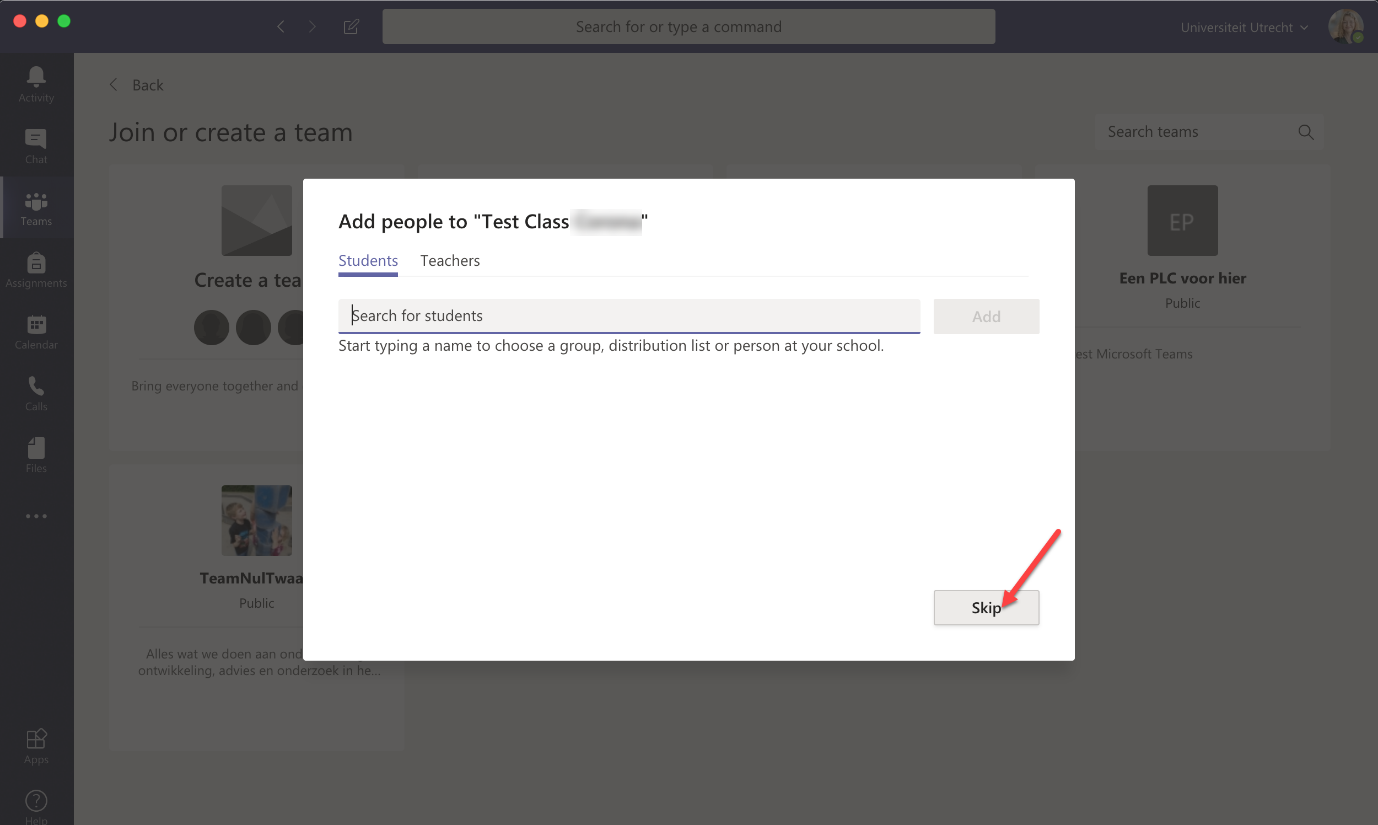
Step 6
Adding students
It is possible to add students to a Team when they are in your address book. This is a lot of work for larger groups however. It is easier to add students via a code (see ‘Part 2: generating a class code’). This allows students to add themselves to the Team. You can share the code (along with the student manual) in Blackboard, so that all students of the course can find it.
Adding guests without a Solis-id
If you wish to add people without a Solis-id (and therefor do not have the same Teams licence) you will have to do this manually.
You can add them with the email address they used to create a Teams account. They will be ‘guests’ in the Teams. This means they won’t have access to the full functionality of Teams. They can however participate in meeting, chat and share files.
-
Step 7
If you want to add other teachers to your team, you can do this via the ‘Teachers’ heading. When you enter the email address of the other teachers, they will be added to the teams with teacher rights.
Please note: it’s important to have at least two and a maximum of four teachers or admins for a Team. That way there will always be someone who can make changes or add students if one person is unavailable. Beside, then there are also not too many people with admin rights.
-
Step 8
Part 2: generating a class code
-
Step 9
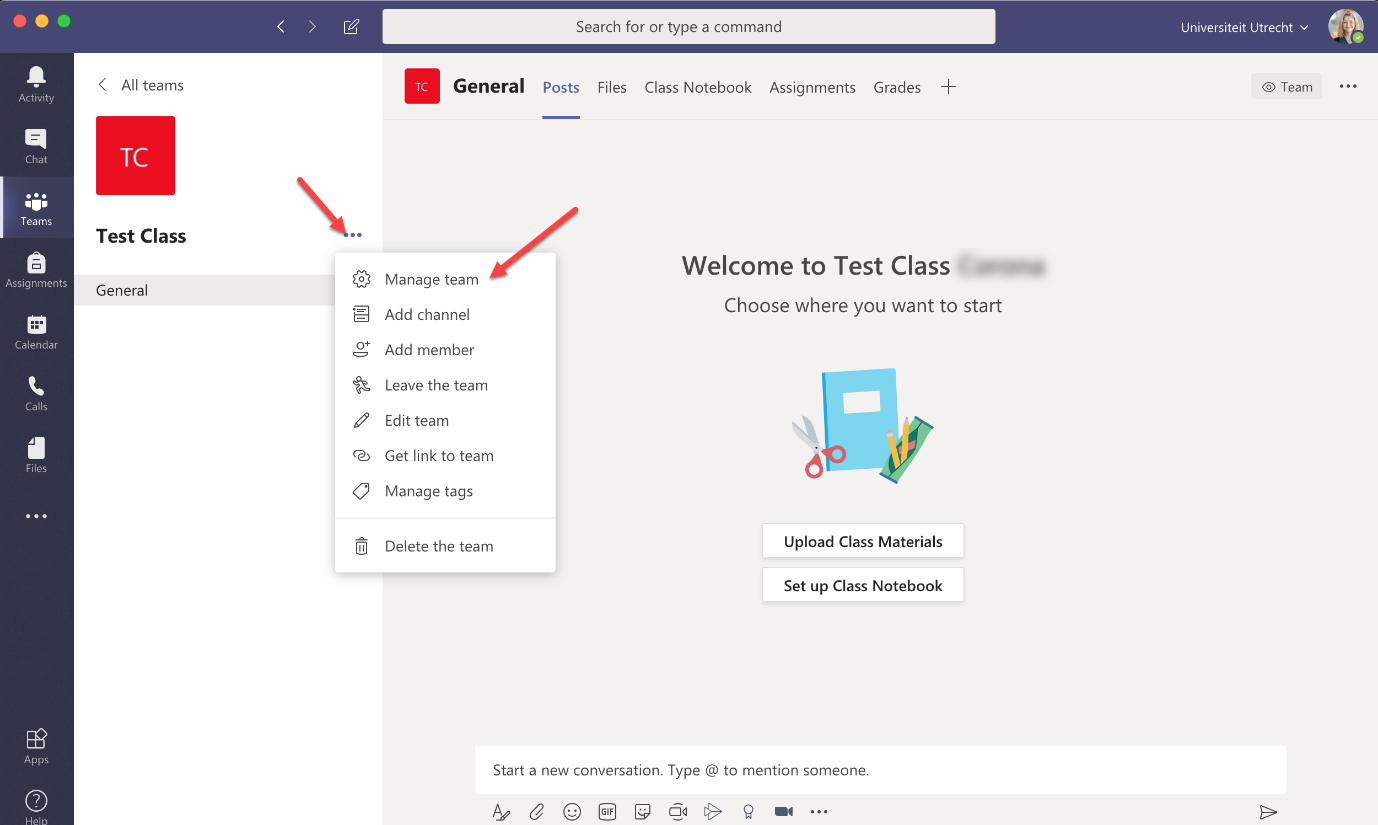
- To generate a registration code (class code) click on the three dots next to the
name of the Team. - Then click on ‘Manage team’
- To generate a registration code (class code) click on the three dots next to the
-
Step 10
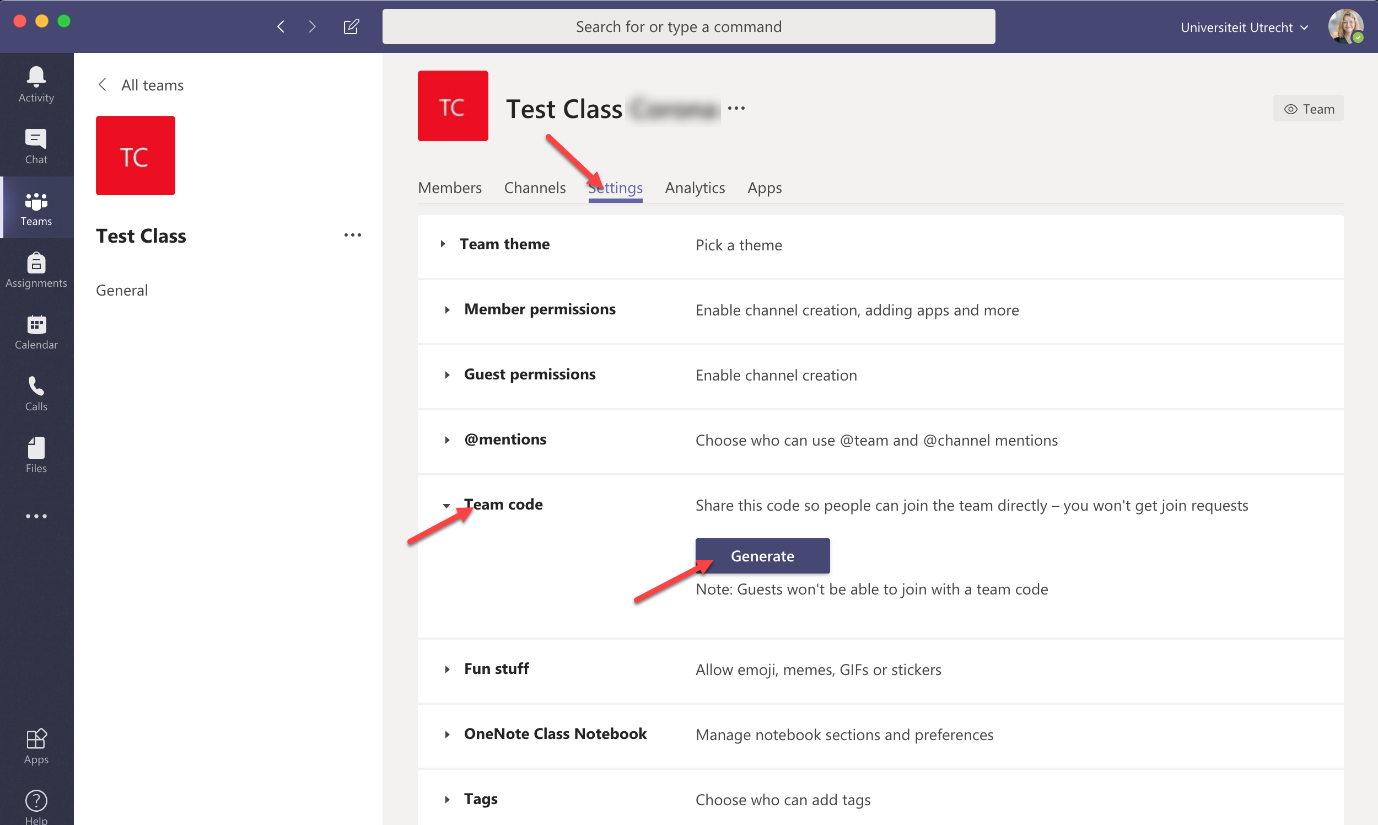
- Go to the ‘Settings’ tab and click on ‘Generate’ below ‘Team code’.
The code and the student guide can be shared on Blackboard or by email. The code gives students access to the Team and all information that is shared there. The student guide contains all the information students need to know about installing and using Teams.
-
Step 11
Part 3: creating a channel in your Team
-
Step 12
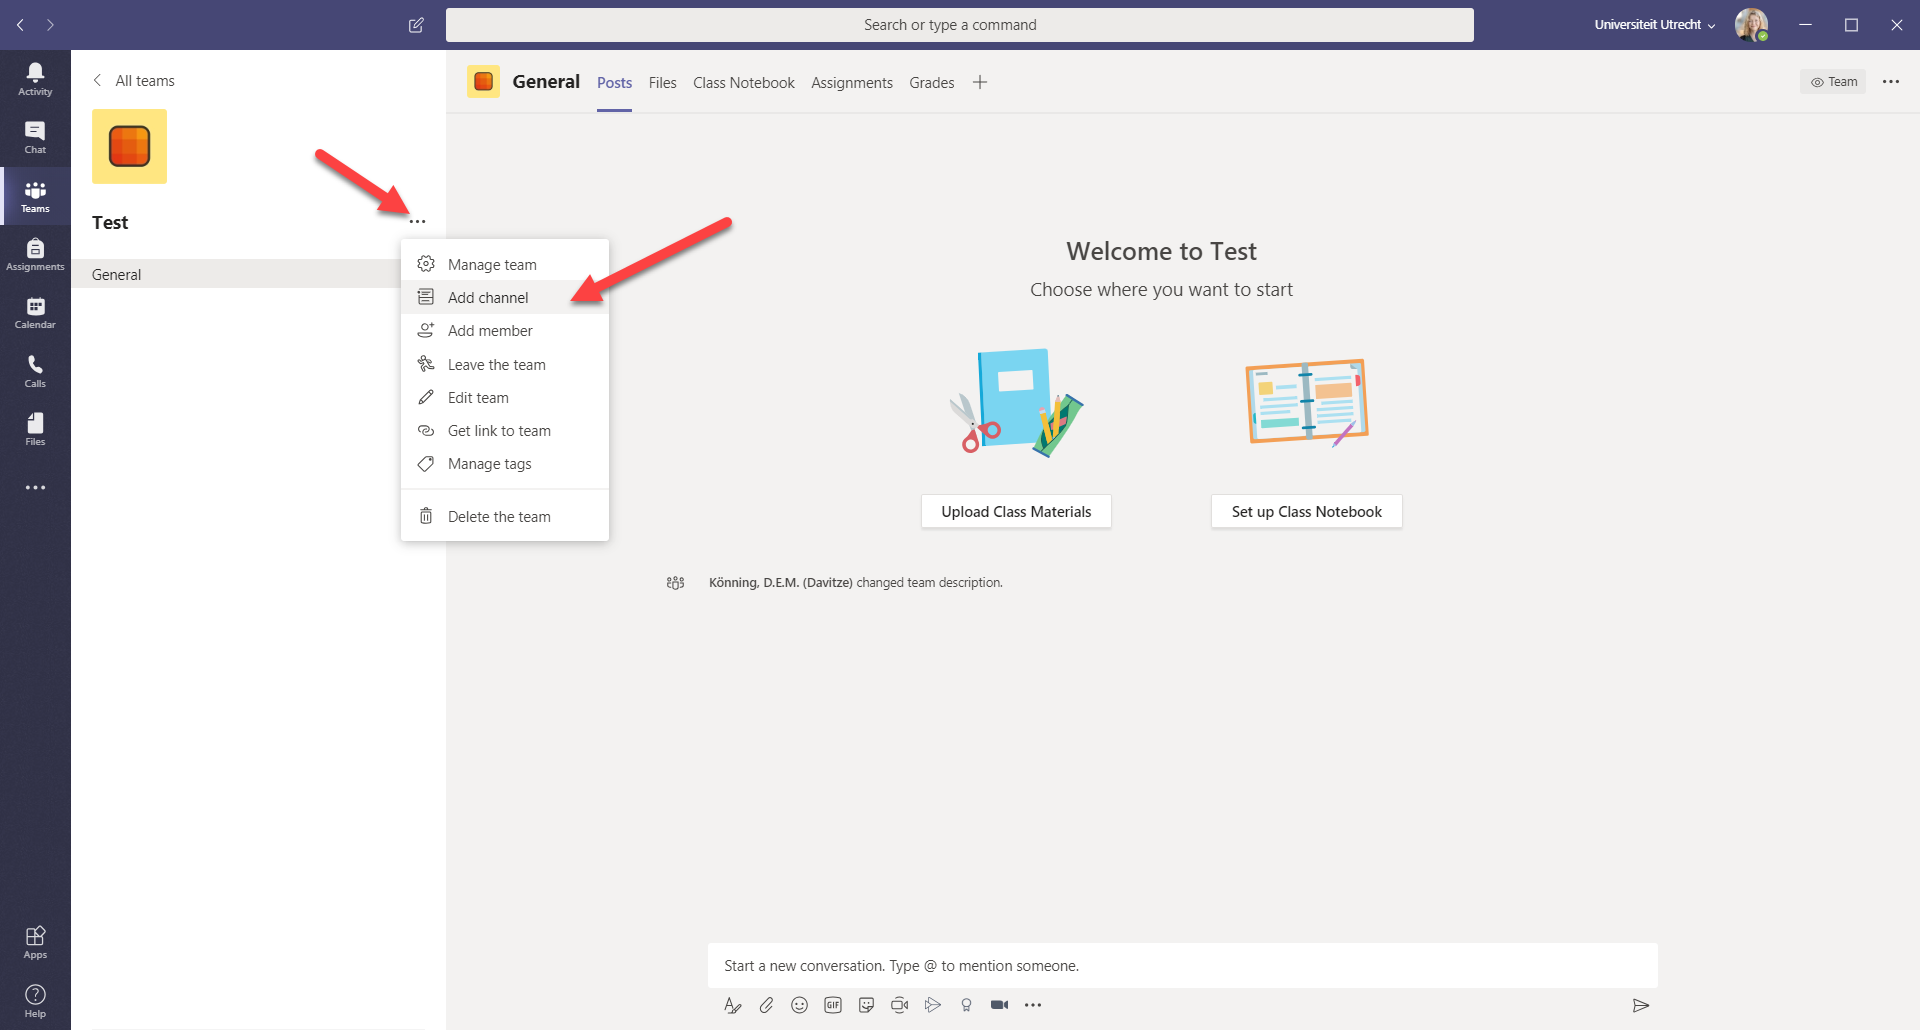
In a newly created Team you will see one standard channel ‘General’. All people in this Team will have access to this channel. You can add other channels yourself:
- Click on the three dots next to the Team name
- Click ‘Add channel’
It is possible to add multiple channels. This can be useful if you want to give a class to only one specific study group for example.
You can also create a channel for (study) groups who need to work together for a presentation/study meeting for example. You can, as a teacher, enter the meeting like you would normally pass by the various groups in class.
-
Step 13
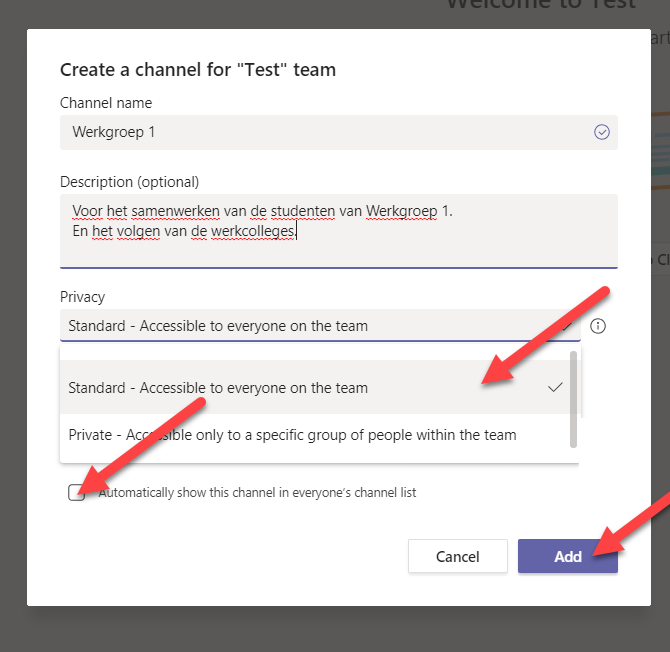
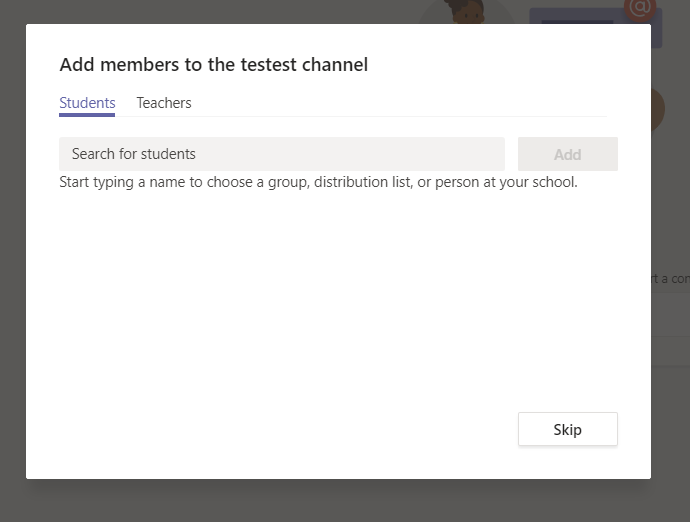
If you make a channel accessible only to specific people (students), you must add all students to the channel one by one.
We recommend – if the information shared per study group is not confidential – giving all students access to all study group channels. This is more error prone, but less work. The student ultimately is responsible in this case.
You can choose to make all channels automatically visible for everyone in the Team. Do this by selecting ‘Automatically show this channel in everyone’s channel list’.
-
Step 14
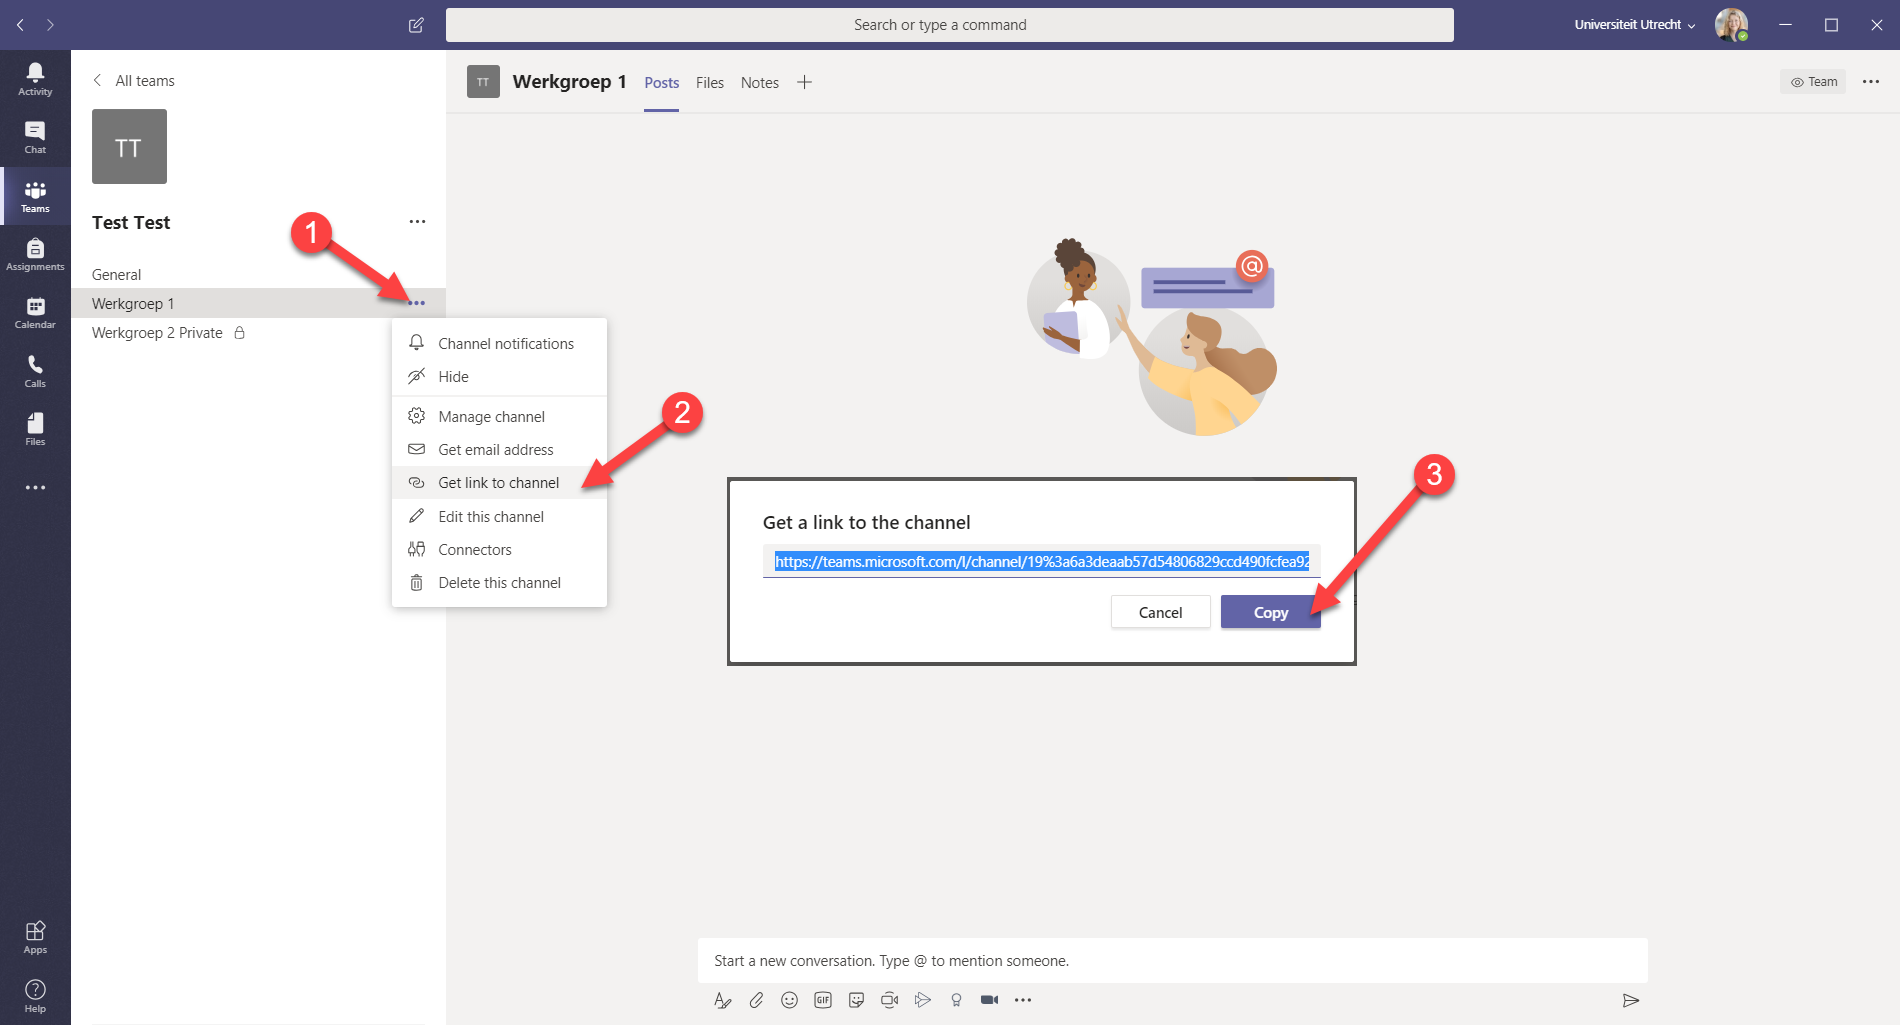
if you do not want all channels to be visible to everyone you can share a link with people that leads to a specific channel.
You can find the link by clicking on the three dots next to the channel name. Then click ‘Get link to channel’: you copy the link by clicking ‘Copy’.
-
Step 15
If you do decide to make the channel private, add the students on the next tab. You can only add people to a channel who are already part of the Team.
In a private channel it is not possible to plan a meetingin advance.
-
Step 16
Part 4: giving lectures online
-
Are you using a public computer in a lecture hall? Then check out this manual for tips and information about audio/camera setting: Teams: Teaching an online class in a lecture room
It’s important you don’t forget to sign out of Teams (and other applications) when you finished the lecture! You can do this by clicking on your profile picture in the top right corner and then choosing ‘Sign out’.

You are not automatically logged out of applications when you log out of the computer or click on the cross symbol in the top right corner of the application.
-
Step 17
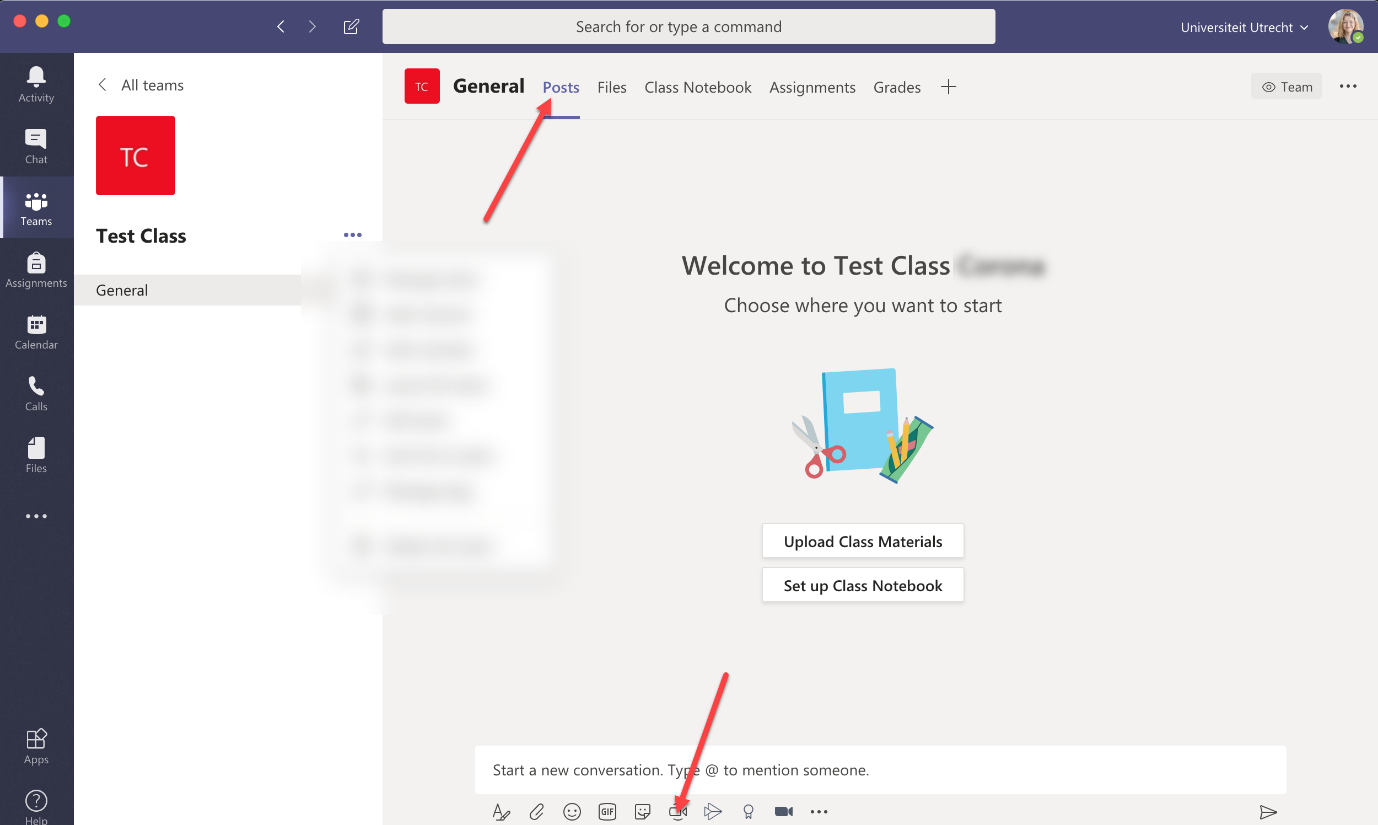
- In the ‘Posts’ tab click on the icon at the bottom of the page (‘Meet now’)
indicated in the picture.
- In the ‘Posts’ tab click on the icon at the bottom of the page (‘Meet now’)
-
Step 18
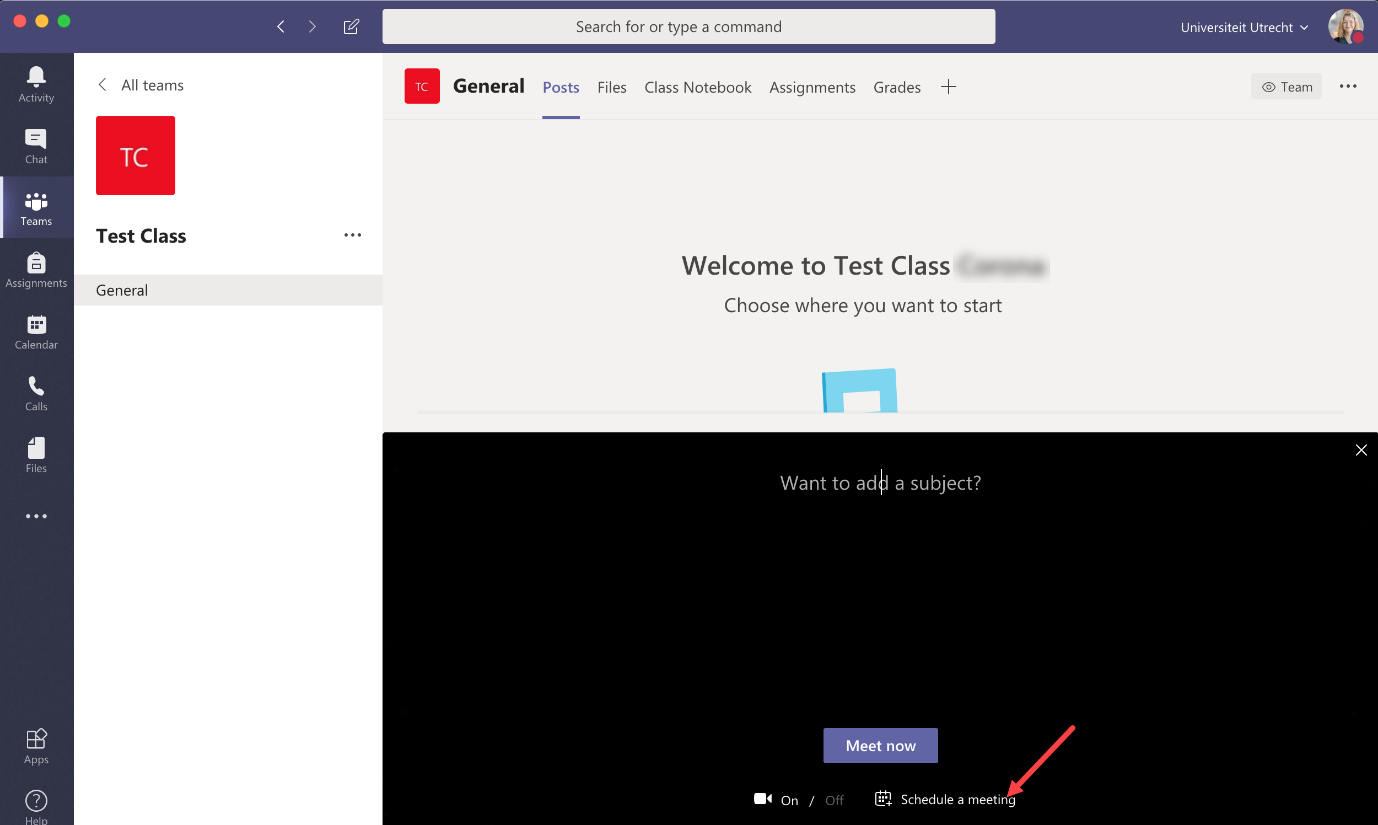
- Click ‘Schedule a meeting’
-

Step 19
- Enter the name, date and other relevant information
- If you select ‘Repeat’ the meeting will be repeated so you do not have to create a new one every time you give the same class
- Click ‘Schedule’
-

Step 20
The meeting will automatically be added to your calendar in the menu on the left.
You can also create new meetings in the calendar by clicking ‘New meeting’.
-
Step 21
You will now see this.
Before you begin presenting:
- Make sure your presentation is ready and opened.
- Ensure your microphone is working.
- Instruct the student about what to expect: most of the information for your students is available in this manual you can share with your students.
-
Step 22
To keep your lecture clear and audible we advise you to have all the students mute their microphone and turn off their video feed.
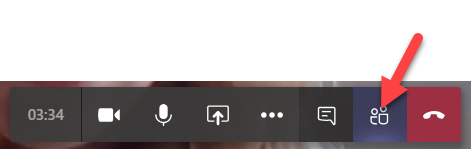
You can mute all the student microphones by going to ‘Participants’ and clicking ‘Mute all’. Everyone can turn their own microphone back on if necessary.
-
Step 23
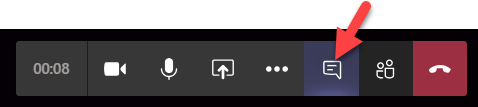
The easiest way to have students interact and ask question is by using the chat function.
In the meeting click the icon as you see in the image.
If you leave this open during the lecture you can see when students ask questions and answer them. You can also choose to read and answer the questions later on.
-
Step 24
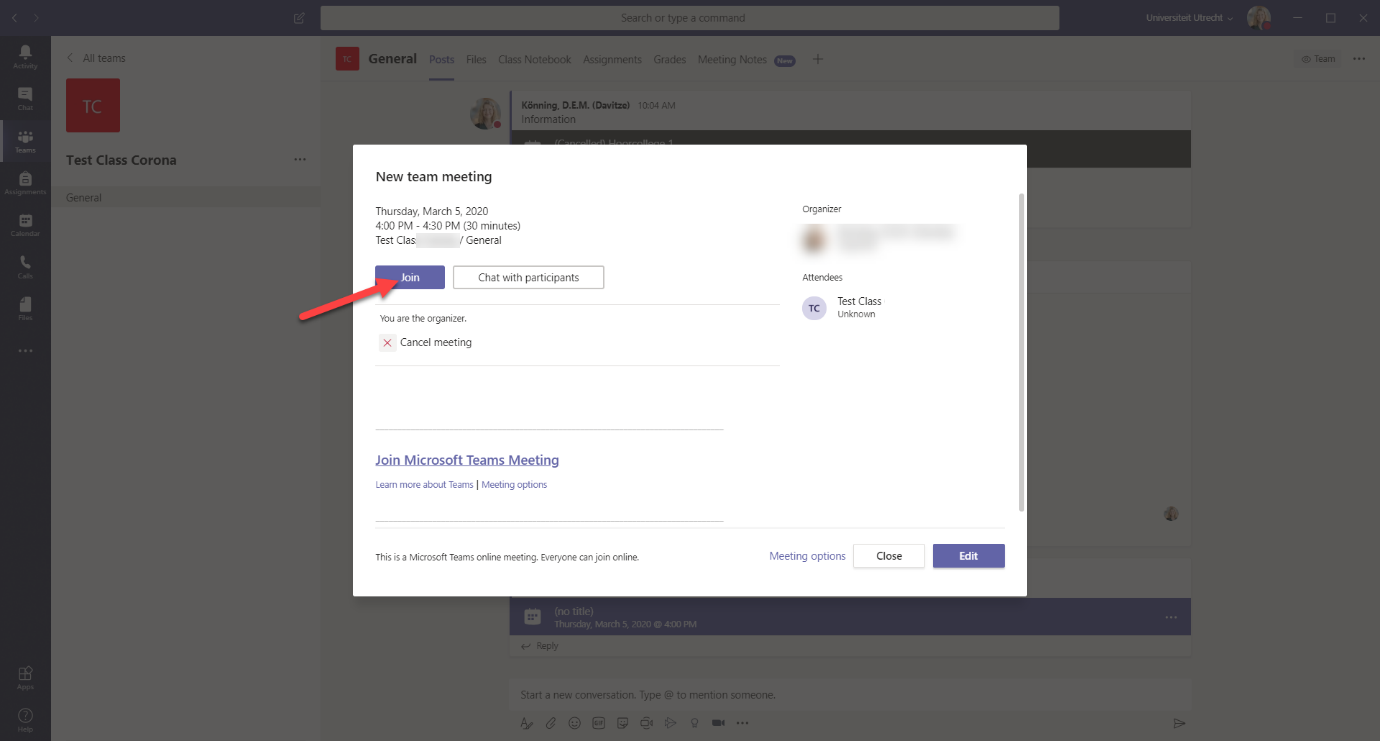
- To enter the ‘meeting’ click on the created meeting in ‘Posts’ or in your calendar. It will both work.
- And then click ‘Join’.
-
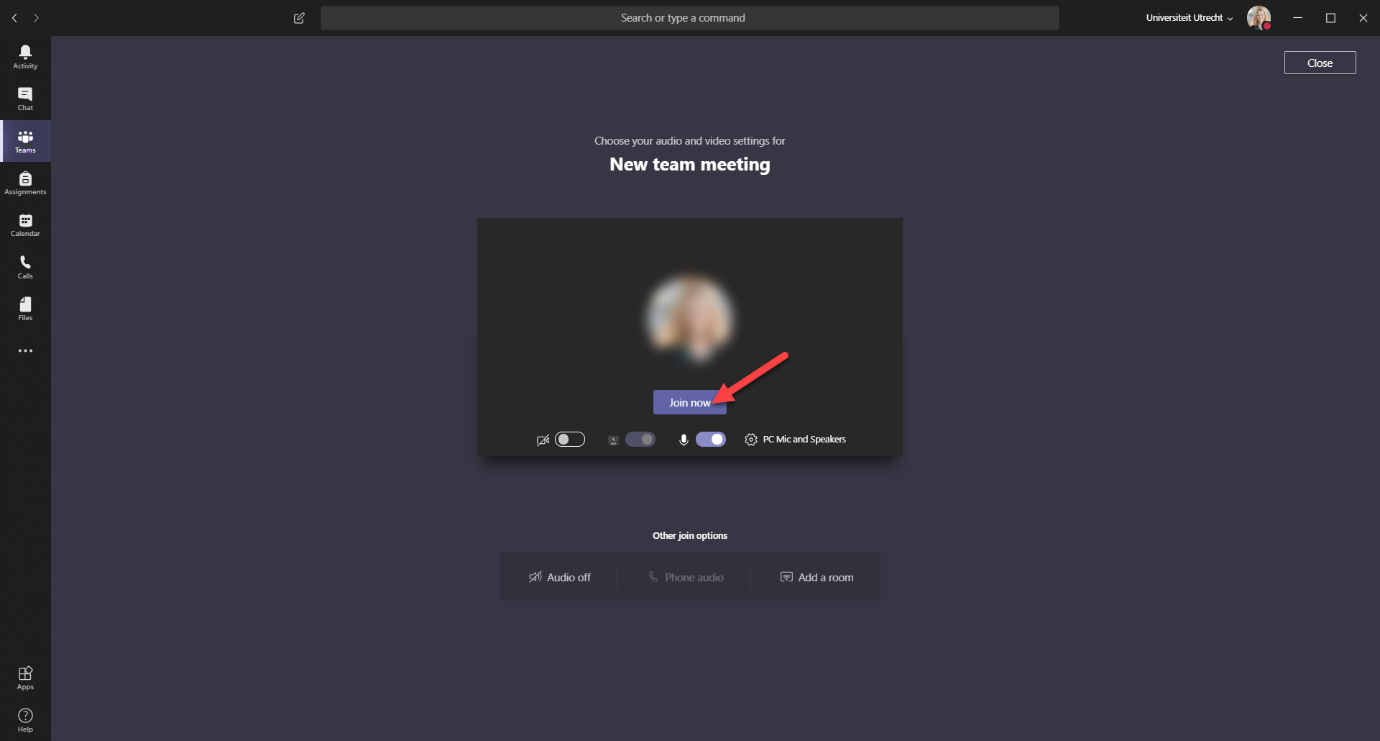
Step 25
Now you can decide whether you want your camera on and/or your microphone.
- Click the buttons to change the settings if necessary
- Then click ‘Join now’
-
You can change these settings during the lecture/meeting by using these buttons:

-
Step 26
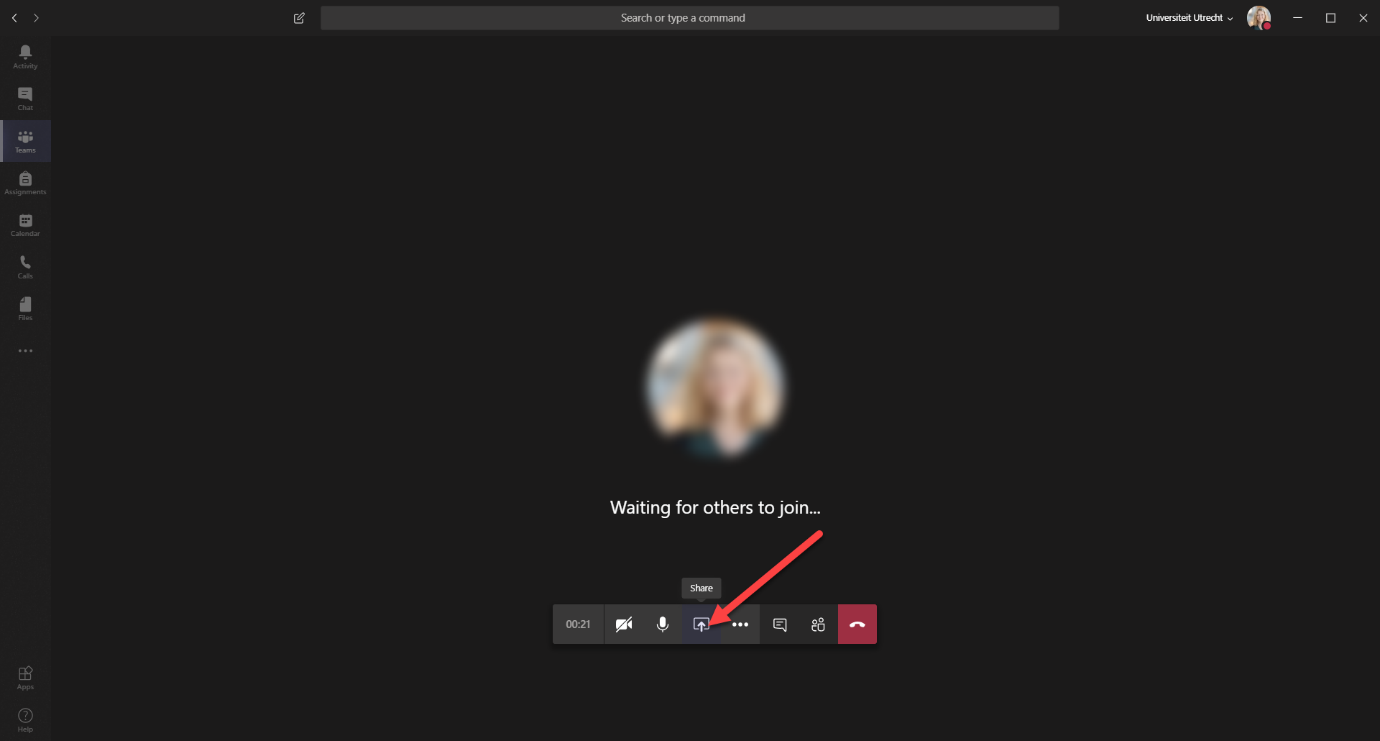
There are 4 ways to share content/information with the students in your lecture group:
1. You can share your entire screen using the option ‘Desktop’. This way you are showing everything that happens on your desktop with the students. This can be useful if you want to share information from different sources/applications. However make sure you close all windows you do not wish to share with your students beforehand.
2. You can share an active application or page using the option ‘Window’ and choosing the window you wish to share. Only this window will be visible to your students. If you are doing something else on your computer at the same time, students cannot see it.
3. You can share a Powerpoint file using the option ‘Powerpoint’. You can drag documents to this location or look for them via ‘Browse’. Using ‘Browse’ you can also share other files.
Please note: Students can take over the presentation. They will see a button ‘Take control’ and can click it to take over the presentation.
4. You can share a whiteboard using the option ‘Whiteboard’. With a whiteboard you can draw and write in a shared space. You can use this for example for brainstorming with students. Read more about this below.
-
Step 27
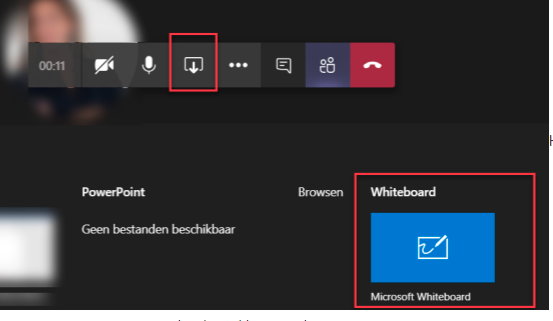
Sharing a whiteboard
Open a whiteboard by clicking on the ‘Share’ button and then choosing ‘Whiteboard’ when you are in a meeting.
If you do not see this option, you might have to install the app first. For more information about the Whiteboard app and installing it, check out this manual: Whiteboard: installation and FAQ.
-
Step 28
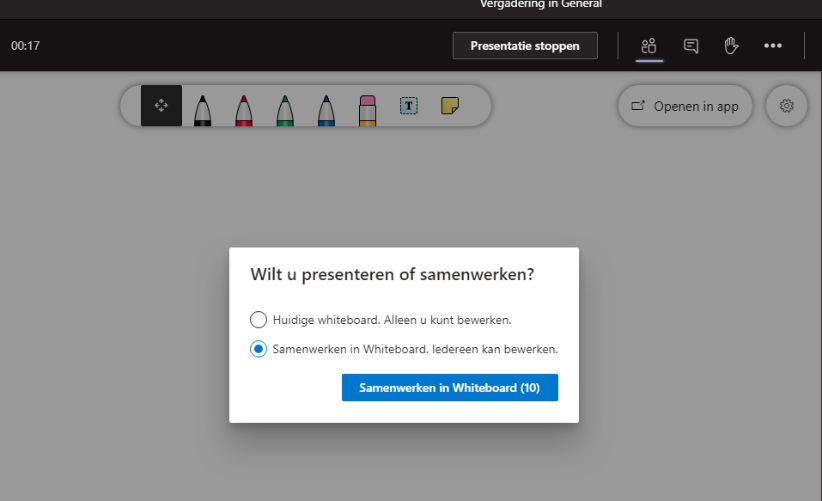
You will get a pop-up asking if you want everyone to be able to edit the whiteboard or just yourself. Choose the option that’s relevant to your situation.
-
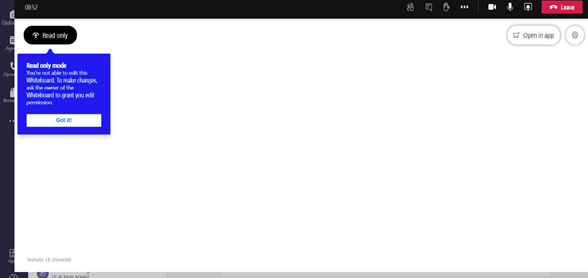
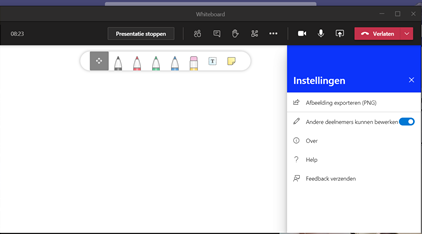
Step 29
You can still adjust these settings later on if necessary. You can do this by using the ‘Settings’ button. This could be helpful if you do not want other people to draw or write over your own work.
Students can see on their own screen whether they can only view or also edit.
-
Step 30
Via the menu bar you can choose various colors, line thickness, text types, the eraser or the post-it option.
If you want to draw you will need a good mouse or drawing tablet. Test your devices before you start the class so you know what works best for you.
-
Students also have the possibility to share their screen, this way they can give a presentation for example. Make sure you give clear instructions on who presents at what time.
-
Step 31
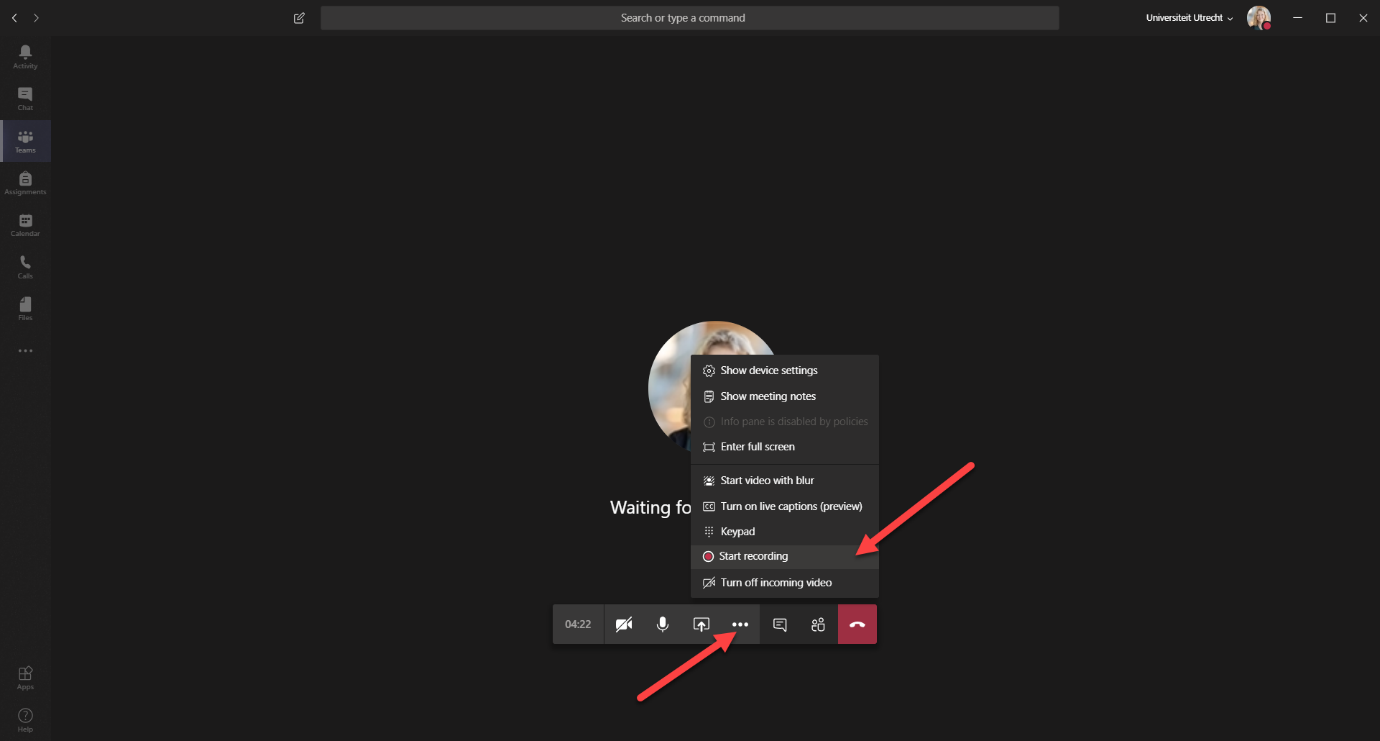
By clicking the three dots you will see a few more options.
Recording a lecture
It can be useful to record your lecture (/meeting) if not all students can follow it live. This can be done by:
- Clicking on the three dots
- Choosing ‘Start recording’
The recording will be saved to SharePoint. After the lecture the recording will automatically appear in the tab ‘Posts’. If you click on the recording then it will be opened and played in a new browser. At the bottom left the expiration date can be changed. People who have access to the channel in Teams where the lecture was scheduled, will also have access to the recording.
Do you want an overview of all the recordings? Then in Teams at the top of the window click on ‘Files’, click on the folder ‘Recordings’ and open the folder ‘View Only’. This folder contains all the recordings of this channel. Students can only view the recordings and cannot download them.
When you’ve created the meeting/lecture in the Outlook or Teams calendar, then the recording will be stored in the OneDrive of the person who pressed the ‘Record’ button during the lecture. When the recording is ready in this OneDrive will be a folder ‘Recordings’. If you open this folder in the browser and click on a recording it will open in a new tab. If you click on the i-icon at the top right then the details panel opens. In this panel you can adjust the expiration date.
Every meeting invitee will get access to the recording automatically, except external people. The recording should be shared with them explicitly from OneDrive.
Please note: Do not share your recordings with the whole organisation. These recordings contain personal data of students.
-
It’s possible that you want to remove a specific recording. To do so open the channel in Teams where the recording is located, at the top of the window click on ‘Files’, click on the folder ‘Recordings’ and open the folder ‘View Only’. All recordings can be found as separate .mp4 files. To remove a recording click right on the file and choose ‘Delete’.
-
Step 32
Recording and setting up sound
By clicking on the three dots you can go to ‘device settings’ and set up how sound is being recorded and played. This can be useful if you are using an extra microphone or speaker. If the sound is not working as you expect, different settings could solve it.
-
Interactivity with Wooclap
If you want to encourage interactivity with your students we recommend using Wooclap. In Wooclap you can, for example, ask for the opinion of students or create a word cloud. In the application it is possible to create a presentation, but you can also import PowerPoint slides into Wooclap. However, this converts the slides from PowerPoint into images so that any animations are lost.- Questions from Wooclap can be added to your PowerPoint as well.
- For more information on how to use and log in to this tool, go to https://educate-it.uu.nl/tool/votingtool-wooclap/.
-
Step 33
Part 5: using breakout rooms
-
Step 34
After the start of a class/meeting you can divide the group into breakout rooms. This can be useful if the students need to discuss things or work together in smaller groups.
You can only set this up if you are using the desktop version of Teams and are the organizer of the class. However, students can log into breakout rooms using the webversion or their phone.
You will find more information about breakout rooms on this page: https://support.microsoft.com/en-us/office/use-breakout-rooms-in-teams-meetings-7de1f48a-da07-466c-a5ab-4ebace28e461#bkmk_createrooms
-
Step 35
Part 6: Teams’ other functionalities
-
Step 36
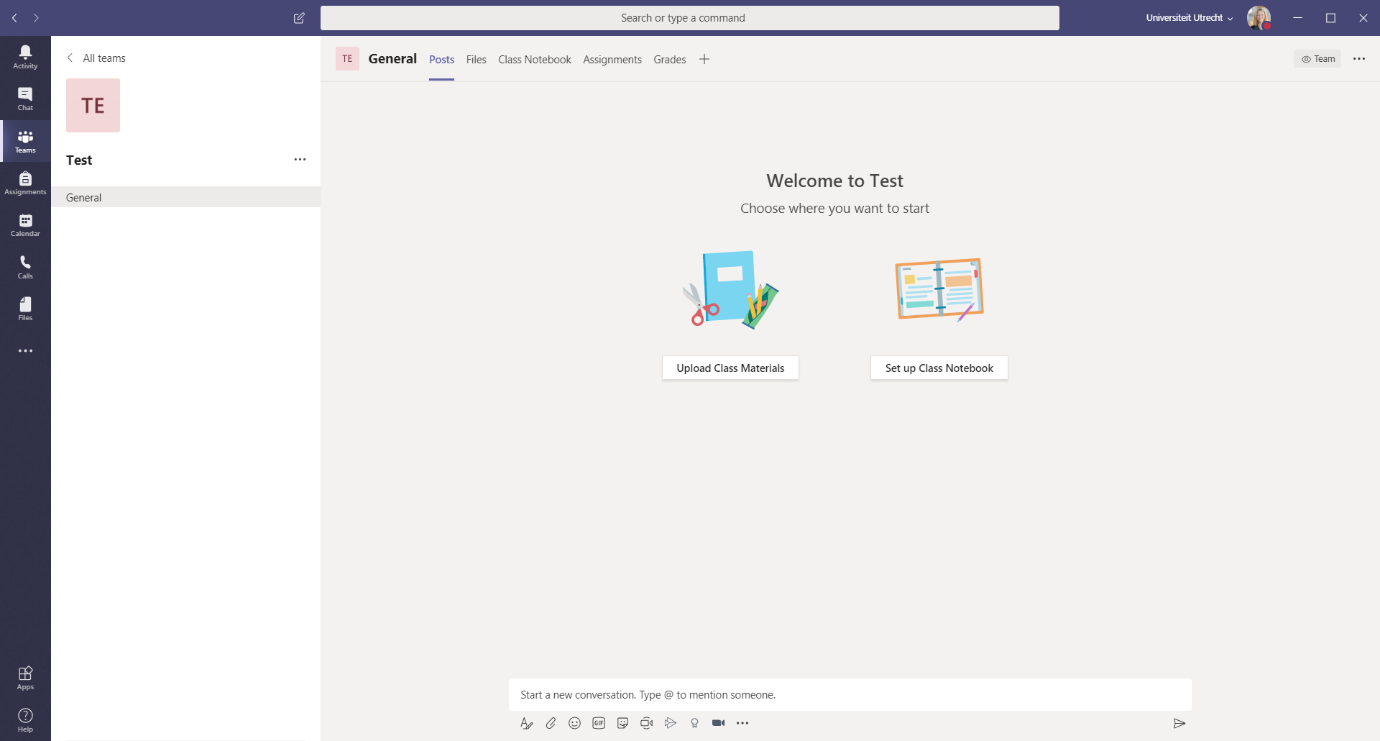
Dashboard
The different Teams you have been added to are listed on your personal dashboard. When you open a team you will first see the main screen.
You can find the menu on the left side of the screen. For example, it is possible to make video calls or chat with other UU students and staff via the ‘Calls’ or ‘Chat’ heading and below the heading ‘Posts’ is a shared chat.
-
Your Teams dashboard can look different from this image, either it is a list of your Teams on the left or squares in an overview. You can switch this view by going to ‘Settings’ and the choosing ‘Switch view’.

-
Step 37
Posts
The tab ‘Posts’ is a chat channel that everyone in the Team has access to. You can use this channel to communicate with the whole group.
It is recommended not to use this channel to share information that might be useful later on, since it is not easy to find the information after there has been a lot of chatting. You are better of using the tab ‘Files’ to share documents and information.
-
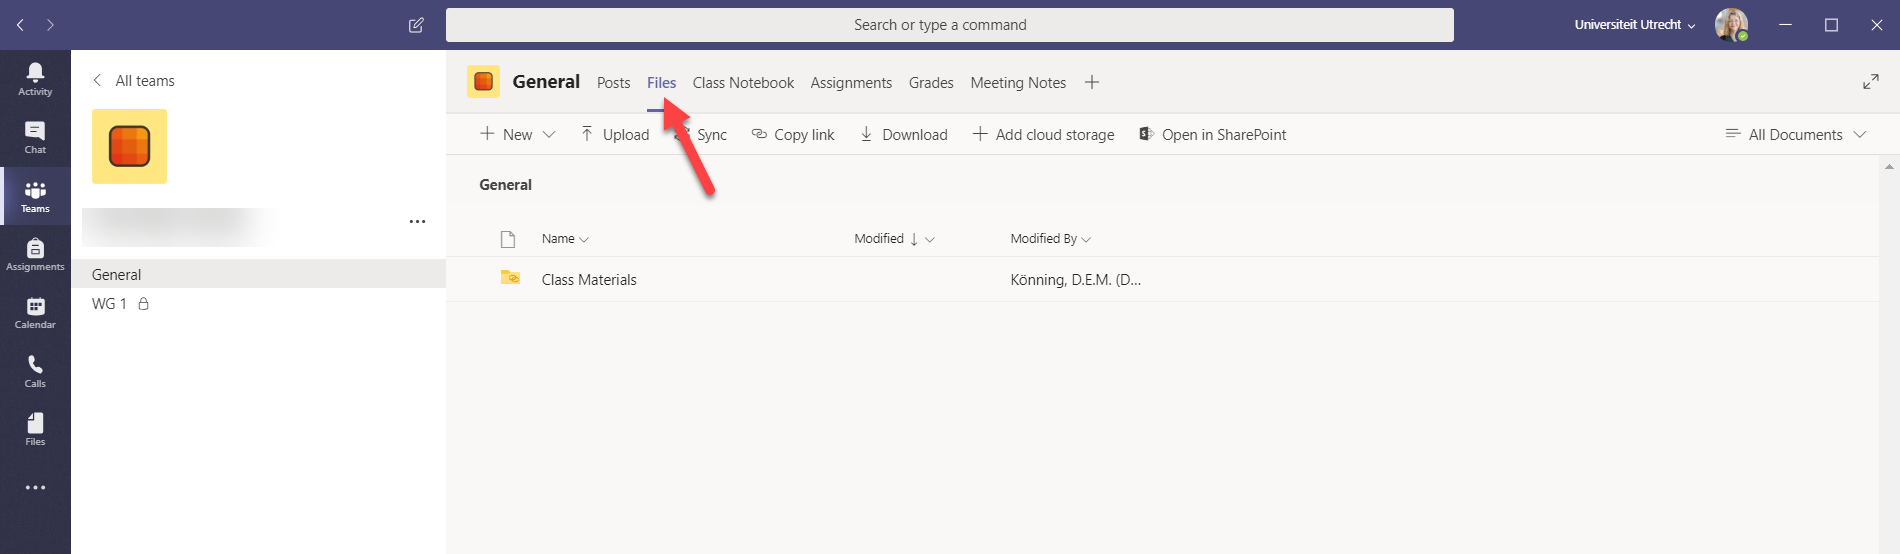
Step 38
Files
At the top is the tab labeled ‘Files’. This is for working together on documents, such as with Google docs. When working in documents that are public, this is visible to everyone. Multiple people can work together in one document. There is a chat function in Word for easy consultation during editing.If you upload a file to ‘Class materials’, only teachers can edit the file. Students cannot edit anything.
It is also possible to work in the desktop app (Word) when it is installed on the computer. This can be opened from teams by clicking on the three dots in the top right corner. Changes made in the desktop app will also appear in Teams.
-
Step 39
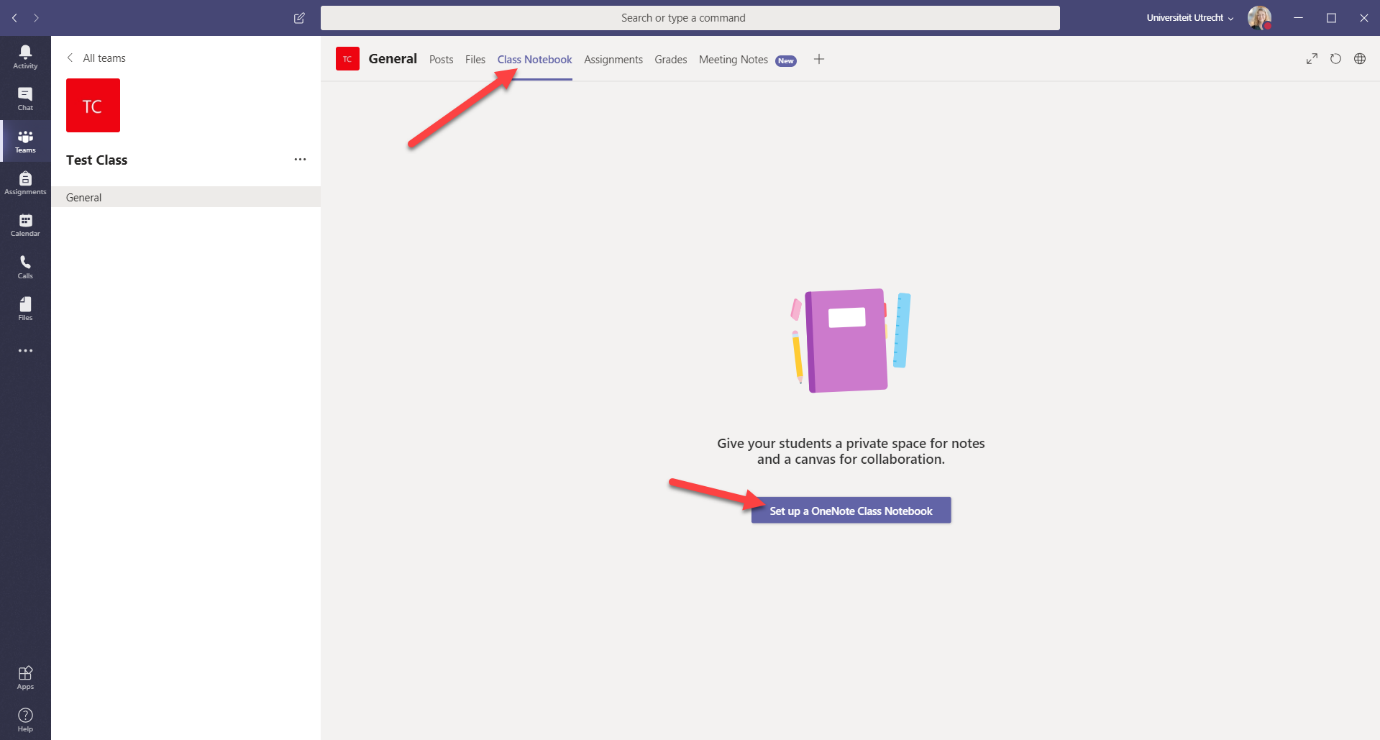
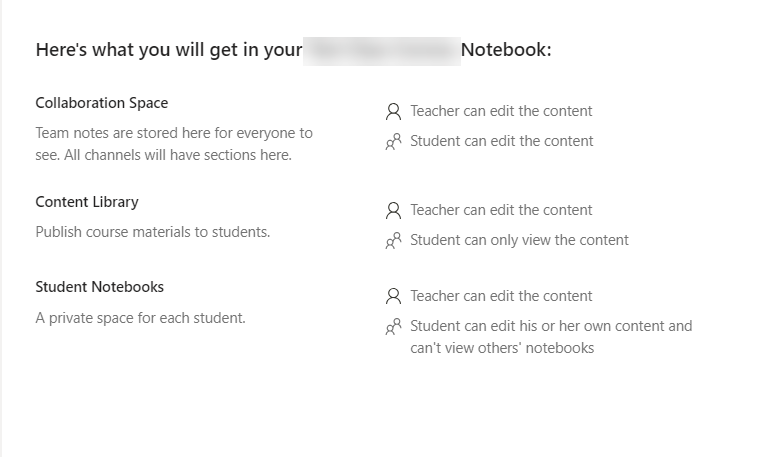
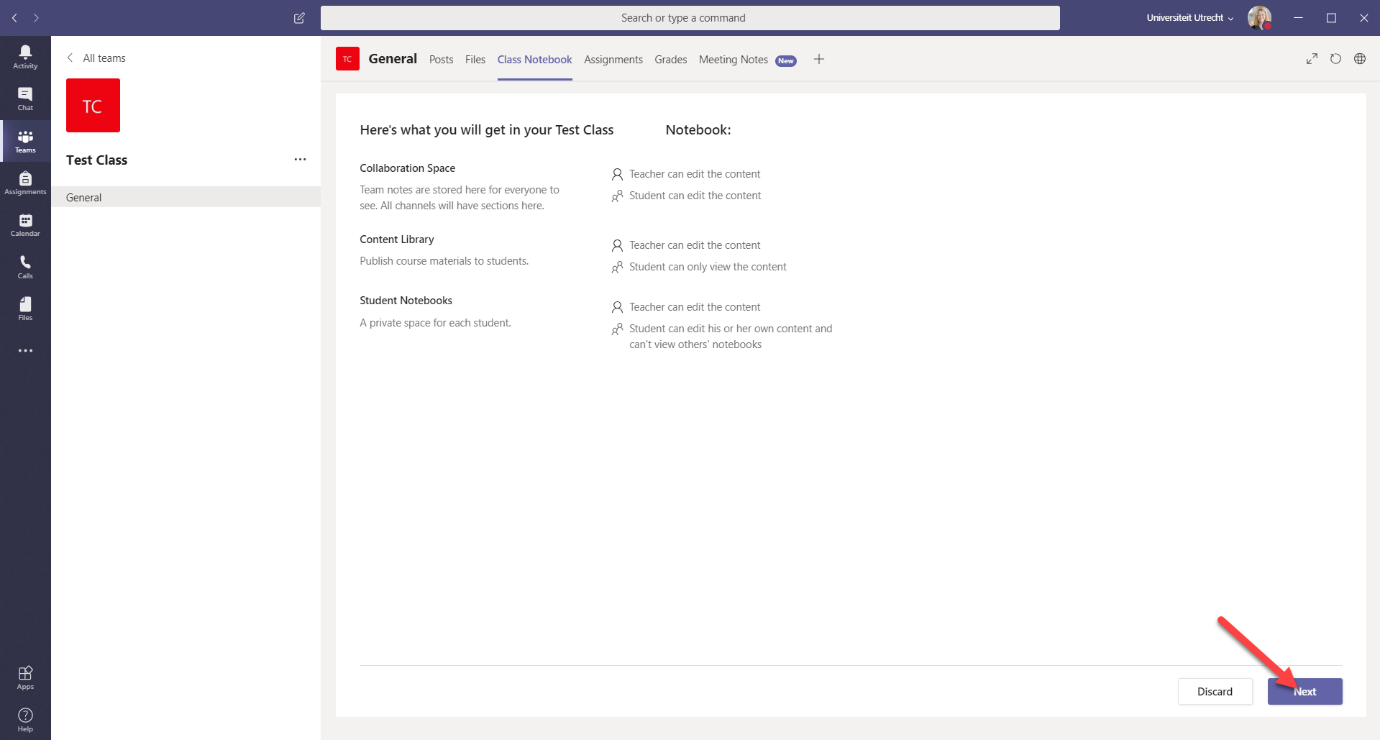
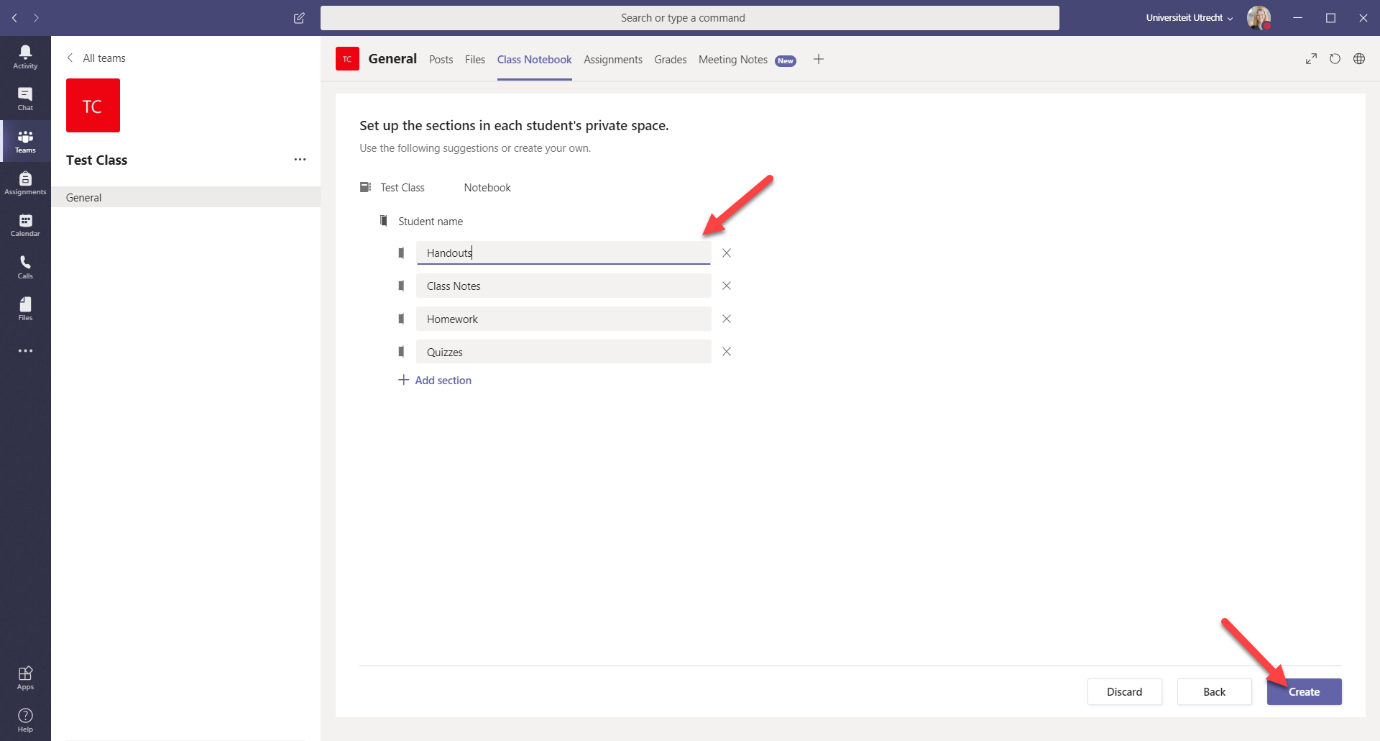
Notebook
The notebook is to share materials with students, but is also suitable as a work space and offers a place for students to include their own documents and notes.- Click ‘Class Notebook’
- Click ‘Set up Onenote Class Notebook’
-
Step 40
The different places in the notebook have different functions.
-
Step 41
- Select ‘Blank Notebook’
-
Step 42
- Here you enter what students see in their personal notes.
-
Step 43
Send a chat message
In the menu on the left you can see the ‘chat’ icon. On the left you will see an overview of the most recent chats and suggestions for contacts. Here you can click on a contact to start a chat. It is possible to search for new contacts under ‘Contacts’.In the header you can change the name of a chat, attach documents, and add tabs. Directly from the header you can start a video or audio call and add participants to the chat.
This can be useful for communicating with students and for students as well.
-
Step 44
Calendar
When you navigate to the calendar you will arrive at the group calendar. Teams links your personal calendar (which is linked to your UU mail) directly to this calendar. It is possible to schedule a new appointment (such as an online meeting) by clicking on ‘+ New Meeting’.
Enter a title, any location, description and start and end time. Add recipients under ‘Invite someone’. -

Step 45
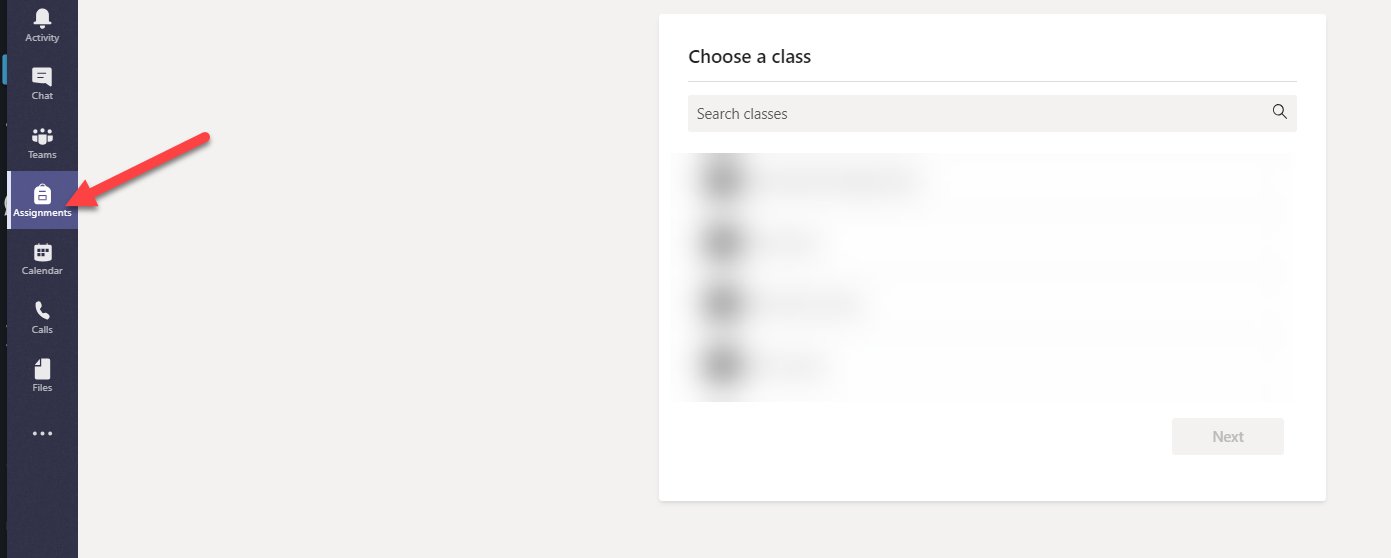
Assignments
The teacher may place assignments under ‘assignments’. -
Step 46
In the menu you can see all the assignments you’ve added.
-
Step 47
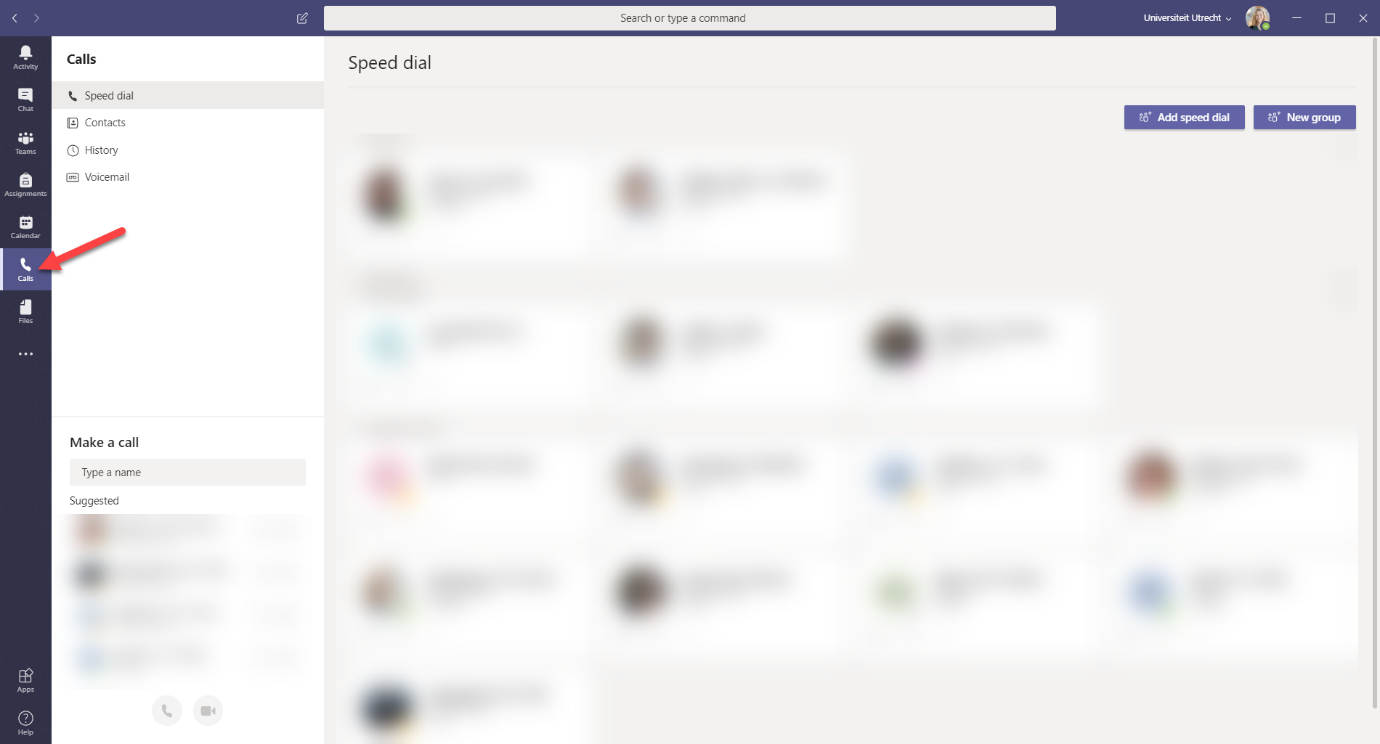
Calls
Under the heading ‘Calls’ you can start a new call. You can also see a list of people you’ve contacted most and an overview of all incoming and outgoing video and audio calls. -
Step 48
Part 7 – updates (‘new meeting experience’)
-
Step 49
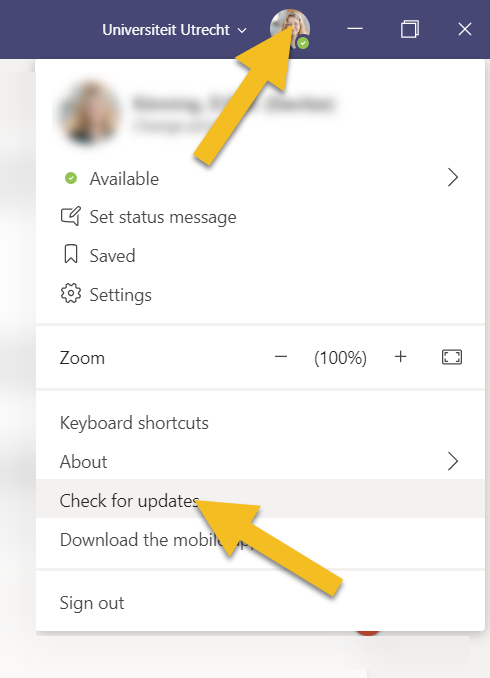
You can update your Teams by clicking on your profile picture in the top right and then clicking ‘Check for updates’.
-

Step 50
You will then see this notification
-
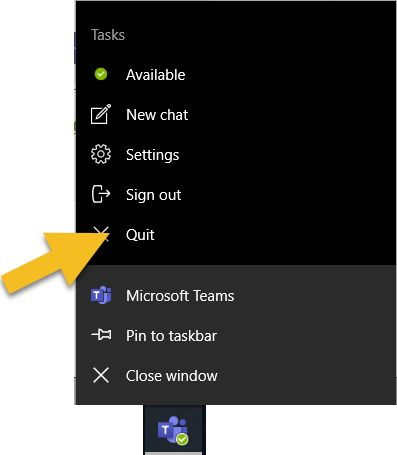
Step 51
To be sure that all updates have completed successfully you should close Teams by right clicking on the Teams icon on your taskbar and choosing ‘Quit’.
Then start Teams again.
-
Step 52
‘The new Meeting experience’
Microsoft has grouped several new functionalities under the header ‘New Meeting experience’.
A few of these functionalities are:
- A meeting appears in a separate window, this allows you to keep using Teams while in a meeting
- The menu bar is places in the top right and is always visible, instead of only when you move your mouse
- The ‘Large gallery mode’ can be switched on and show up to 49 people at the same time
- In the ‘together mode’ you can see students as if they are seated in a class room
-
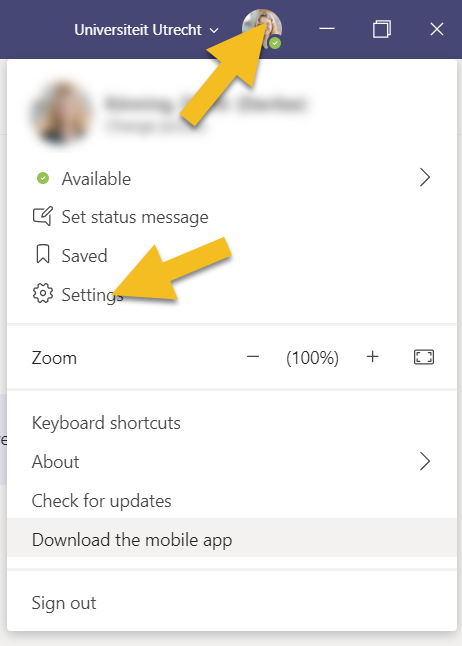
Step 53
You can switch on the ‘new meeting experience’ by clicking on your profile picture and then choosing ‘settings’.
-
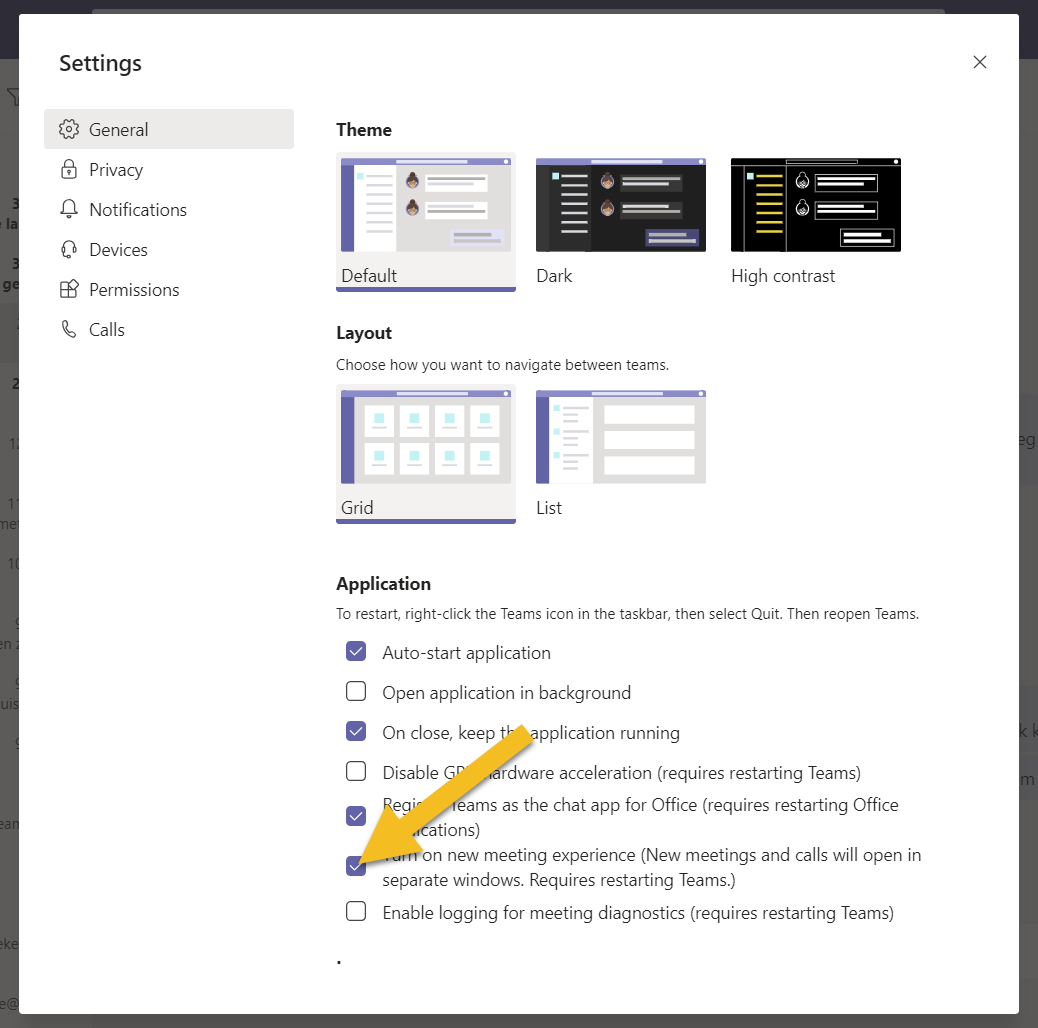
Step 54
In ‘Settings’ you can select ‘new meeting experience’. After selecting this you have to shut down Teams (as described above) and restart it.


Last modified: 10/02/2023