
Teams: participate in workshop
Are you about to attend a workshop or congress using Microsoft Teams? Then make sure you are prepared and have installed the application beforehand.
- If you are an employee/student of Utrecht University, click here to read how to install Teams.
- If you are a guest in Teams, click here to read how to install Teams.
Microsoft Teams offers a nice, interactive experience that works best with the Teams app. We recommend that you download the app because the web version is not supported by all browsers. When you participate in this event, your name, email address and/or phone number will be visible in the session participation list. By participating in this event, you agree to this.
-
Step 1
Participate in the workshop
Prior to the workshop you will receive an invitation link that will give you access to a Teams channel.
In this channel you can click on “join” to participate in the workshop.
-

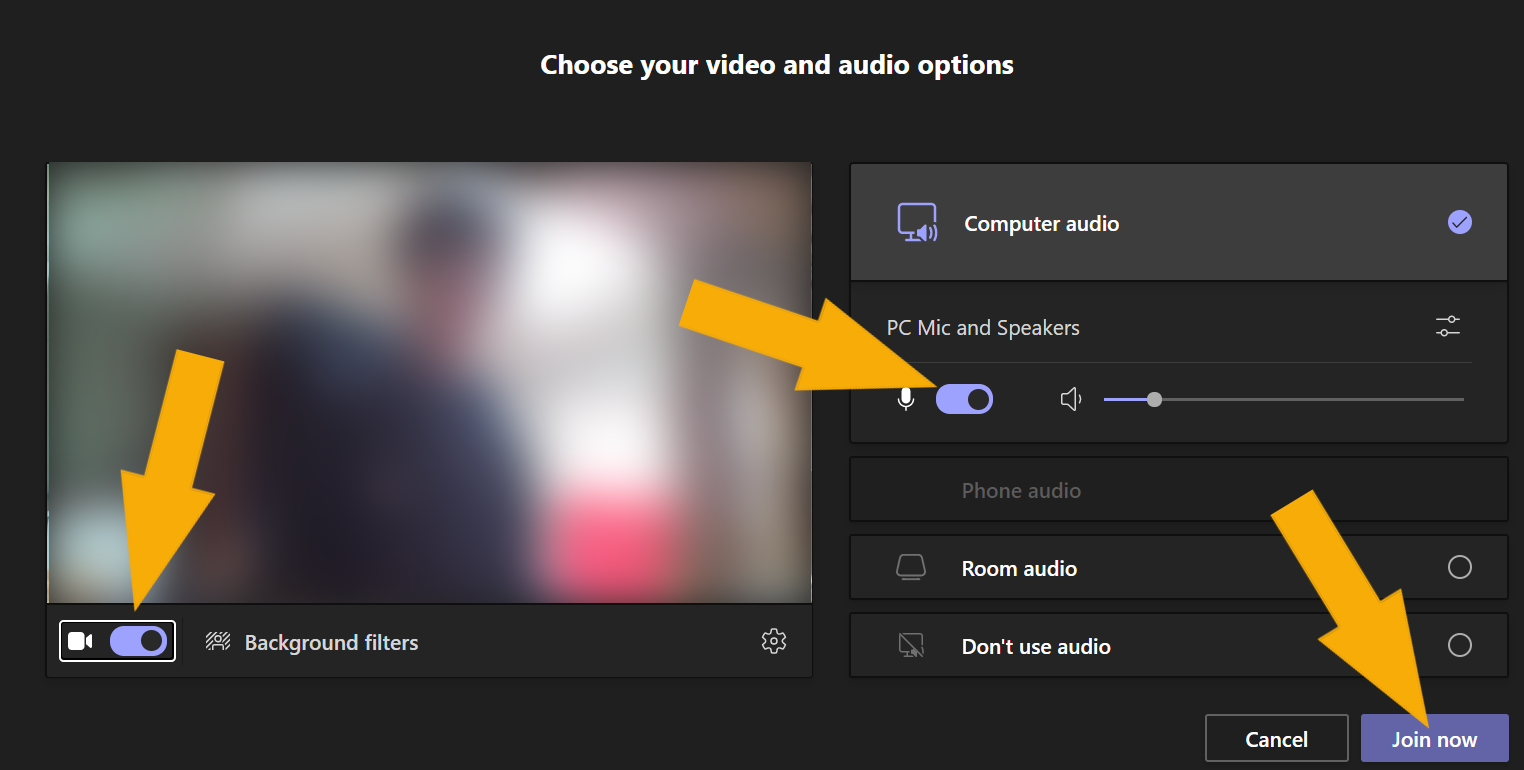
You can choose whether you want your camera and microphone on or off by moving the sliders back and forth. We recommend to have your microphone off if you start a workshop with many participants. You can turn your microphone on during the workshop if you want to say something.
-

Step 2
Various options during a workshop
From left to right in the image:
- The window under the button with 2 persons, you can find a list of the participants of the event.
- In the window under the button with a text bubble, you can send chat messages to each other.
- Participants can use this hand to virtually raise their hands. Their video screen gets a border around it and you know that they want to ask a question.
- The ··· offers several options. Below are the possibly relevant ones:
– “Large gallery”. By selecting this you can see all participants at the same time.
– “Apply background effects”. This allows you to adjust your background if necessary.
–“Start recording”. With this you can record the workshop.
- The camera button turns your camera on and off. If there is a line through it, it is off.
- The microphone button turns your microphone on and off. If there is a line through it, it is off.
- The button depicting a screen with an arrow allows you to share your screen (more about this below).
- The red “Leave” button allows you to leave the meeting.
-
Step 3
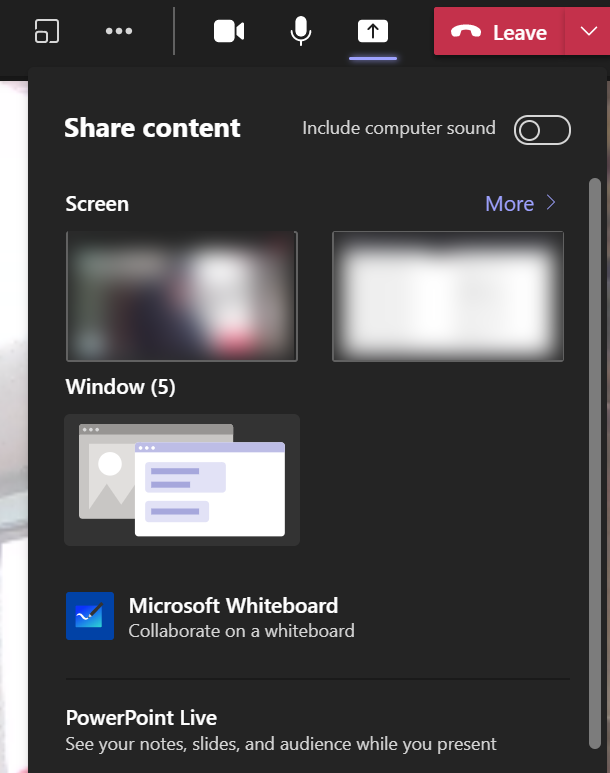
Sharing your screen during a workshop/meeting
There are 4 ways to share your screen:
1. You can share your full screen by clicking the screen that you would like to share. Here you show everything that happens on your screen to the participants. This is useful if you want to share information from different applications. It is recommended to close all windows you do not want to show before you start your workshop.
2. You can share a specific open application or page via the “Window” option. You choose the window you want to share. Only that window will be visible to the participants. If you do something somewhere else on your computer, the participants will not see it.
3. You can share a PowerPoint file using the “PowerPoint Live” option. You can drag in a document here or search for it via “Browse”. Via “Browse” any other documents can also be shared. Note: Participants can take over the presentation. If a button “Take control” appears, a participant can control the presentation.
4. You can share a Whiteboard via the “Microsoft Whiteboard” option, for example to draw or write. In addition, you can also use the Whiteboard to brainstorm with other participants. In this manual you will find more information about Whiteboard: Whiteboard: installation and FAQ
-

Step 4
Sharing files
In the Teams channel you will find a tab “Posts”, here you can exchange messages with the other participants.
You will also find a tab “Files”, here you can find the files that are shared in the channel or prepared by the person organizing the workshop.
-

Step 5
You can also collaborate in documents. When working in documents that are public this is visible to everyone. Multiple people can work together in one document. There is a chat function in Word so that it is easy to consult during editing.
It is possible to work in the desktop app (Word) when it is installed on the computer. It can be opened from Teams by clicking on the three dots in the top right corner. Changes made in the desktop app will also appear in Teams.
-
General tips
- Use the ··· to select “Large gallery”. By selecting this you can see all participants at the same time.
- Turn off your microphone when you are not speaking to avoid unnecessary background noise.
- If you want you can change the size of the view of the speaker. Go to the participants list (left most button at the top of your screen) and click on the ··· next to the participant you want to view in particular and select “Spotlight”. Every participant will now see this person larger than the other participants.
- You can also use the chat option to have a chat with each other (see image).

Last modified: 18/06/2021